Basics
Expressing a view using JSON is pretty straightforward.
However what makes Jasonette truly powerful is the ability to express functions that actually do something, entirely in JSON. We call it action.
This could be anything from accessing the device features such as camera or addressbook, to making network requests. And you can compose them to carry out any sophisticated tasks. Not to mention being able to use inline Javascript within any JSON expression.
Syntax
Actions can take the following 5 attributes
type: Specify action type. (note: THIS CANNOT BE A TEMPLATE EXPRESSION that needs to be evaluated. Use a static string.)options: Arguments to be passed into the action (optional)success: Another action to be called when the current action finishes. You can chain multiple actions to execute in sequence this way. (optional)error: You can handle exceptions by attachingerrorto an action. (optional)
There are two ways of calling actions:
- You can directly attach actions to UI elements inline. In this case, the action will be executed when a user taps the element.
- You can define an action under actions registry and trigger it by name. In this case you not only can attach actions to UI elements but also can trigger them based on system events or call them from anywhere.
First read through the explanation below to learn how to define actions inline.
And after that, learn how to use "trigger" to trigger an action by name.
Examples - Define Inline
Network request and then render
Make a network request and $render its content when it succeeds.
{
  "type": "label",
  "text": "refresh",
  "action": {
    "type": "$network.request",
    "options": {
      "url": "https://jasonbase.com/things/jYJ.json"
    },
    "success": {
      "type": "$render"
    }
  }
}
Network request and then render, with error handling
Same as above, except display a banner when the request fails.
{
  "type": "label",
  "text": "refresh",
  "action": {
    "type": "$network.request",
    "options": {
      "url": "https://jasonbase.com/things/jYJ.json"
    },
    "success": {
      "type": "$render"
    },
    "error": {
      "type": "$util.banner",
      "options": {
        "title": "Error",
        "description": "Something went wrong."
      }
    }
  }
}
Return values
You can access an action's return value by using the variable $jason from the next action (either the success or the error action).
For example, $geo.get action returns the geolocation of the current device in the following format:
{
  "coord": "51.5032510,-0.1278950"
}
Which means we can use this return value by accessing the $jason variable, using a template like this:
{
  "type": "$geo.get",
  "success": {
    "type": "$util.banner",
    "options": {
      "title": "Your current coordinate",
      "description": "{{$jason.coord}}"
    }
  }
}
What kind of UI elements can have action handlers?
action can be attached to various UI elements to respond to touch, but not all.
CAN be attached to:
- menu -
$jason.body.header.menu - footer tabs -
$jason.body.footer.tabs - footer input -
$jason.body.footer.input.leftand$jason.body.footer.input.right - Top level of a section item - Example:
$body.sections[0].items[0] - Layer item - Example -
$body.layers[0].items[0] - Button component - Normally you need to attach actions at at the item level as described above. But if you want to attach an action at a component level, you can use "type": "button.
CANNOT be attached to:
CANNOT attach actions to a label or image component unless it's at item level. Here's an example that DOESN'T work::
{
  "items": [{
    "type": "vertical",
    "components": [{
      "type": "label",
      "text": "touch me",
      "action": { ... }
    }]
  }]
}
label and any other non-button type components do not respond to touch events directly.
This is why above code won't respond to touch, since it's attaching the action to the label.
However the following code WILL respond to touch:
{
  "items": [{
    "type": "label",
    "text": "touch me",
    "action": { ... }
  }]
}
This is because the label is at item level. Jasonette automatically wraps components with a layout when they're at item level.
Which means, internally above code is the same as:
{
  "items": [{
    "type": "vertical",
    "action": { ... },
    "components": [{
      "type": "label",
      "text": "touch me",
    }]
  }]
}
Notice how the action is tied to the vertical layout, which is at item level. So this will respond to touch.
So what if you really want to attach an action to a component, but the component is NOT at item level?
=> Use buttons, like this:
{
  "items": [{
    "type": "vertical",
    "components": [{
      "type": "button",
      "url": "https://.....",
      "action": { ... }
    }]
  }]
}
Where to use actions?
Actions are not just for UI components. It can be triggered in various ways, and used for various situations:
- Handling user interaction
- Handling another action's result
- Handling system events
Let's go through each:
A. Handling user interaction
■ User touches an item
Attach action attribute to items, menu, layers, etc. to react to touch. (Read API documentation to see if a component supports action attribute)
In the example below, an action is attached to a menu, so it gets triggered when user touches it.
{
  "head": {
    ...
  },
  "body": {
    "header": {
      "menu": {
        "text": "Press me",
        "action": {
          "type": "$util.alert",
          "options": {
            "title": "Good job!",
            "description": "You know how to press a button!"
          }
        }
      }
    },
    ...
  }
}
■ User changes a form input value
There are some form input components such as slider, search, etc. which trigger an action whenever its value changes. Just attach action attribute to handle that event.
In the example below, an action is attached to a slider, so we can display a banner with the current value whenever user changes the value.
{
  ...
  {
    "type": "slider",
    "name": "gauge",
    "action": {
      "type": "$util.banner",
      "options": {
        "title": "Current value",
        "description": "{{$get.gauge}}"
      }
    }
  }
  ...
}
B. Handling another action's result
All actions can have a success and an error attribute.
successpoints to an action to be triggered after the current action finishes.errorpoints to an action to be triggered if something goes wrong with the current action.
By using success, we can chain multiple actions.
In the example below, a $network.request action gets called when a user touches the label, renders the result when it succeeds (success), and displays an error message when something goes wrong (error).
{
  ...
  {
    "type": "label",
    "text": "Touch me",
    "action": {
      "type": "$network.request",
      "options": {
        "url": "https://www.jasonclient.org/items.json"
      },
      "success": {
        "type": "$render"
      },
      "error": {
        "type": "$util.banner",
        "options": {
          "title": "Error",
          "description": "Uh oh, something went wrong."
        }
      }
    }
  }
  ...
}
C. Handling system events
System events are events automatically triggered by the system, instead of through user input.
You can attach any action to system events, such as $load, $show, $foreground, etc.
Here's a brief example:
{
  "$jason": {
    "head": {
      "actions": {
        "$load": {
          "type": "$network.request",
          "options": {
            "url": "https://jasonbase.com/things/jYJ.json"
          },
          "success": {
            "type": "$render"
          }
        },
        "$show": {
          "type": "$reload"
        },
        "$foreground": {
          "type": "$reload"
        }
      }
    },
    ...
  }
}
Learn more about system events
Triggering actions
When you define an action inline, these actions have no name. Therefore you cannot reuse them form elsewhere.
To be able to reuse actions, you need to register them under actions registry, and then trigger them by name.
Syntax
To trigger an action, you can use the following syntax:
"trigger": Trigger an action by name, registered under the actions registry. (note: THIS CANNOT BE A TEMPLATE EXPRESSION that needs to be evaluated. You must use a static string)"options"(optional): same as inline actions"success"(optional): executed when the triggered action returnes via$return.successaction"error"(optional): executed when the triggered action returns via$return.erroraction
They look similar to inline action definition except that you use trigger instead of type.
1. Define an action under the actions registry
First, you need to define the action inside head.actions. In this case we name it refresh_view:
{
  "$jason": {
    "head": {
      "actions": {
        "refresh_view": {
          "type": "$network.request",
          "options": {
            "url": "https://jasonbase.com/things/jYJ.json"
          },
          "success": {
            "type": "$render"
          }
        }
      },
  ...
}
2. Trigger it by name
Second, to actually trigger it by name, just attach an action with a trigger attribute, like this:
{
  "type": "label",
  "text": "Refresh",
  "action": {
    "trigger": "refresh_view"
  }
}
Cool thing about this is, now you can trigger this action from anywhere in your code. You can trigger it manually from another action, or you could make it so that a system event automatically triggers the action.
Here's an example where refresh_view is triggered whenever the view comes into focus ($show) or comes back from background ($foreground):
{
  "$jason": {
    "head": {
      "actions": {
        "$show": {
          "trigger": "refresh_view"
        },
        "$foreground": {
          "trigger": "refresh_view"
        },
        "refresh_view": {
          "type": "$network.request",
          "options": {
            "url": "https://jasonbase.com/things/jYJ.json"
          },
          "success": {
            "type": "$render"
          }
        }
      },
  ...
}
Here's an example where an action triggers another action (refresh sets the cache, and then triggers fetch):
{
  "$jason": {
    "head": {
      "actions": {
        "refresh": {
          "type": "$cache.set",
          "options": {
            "items": []
          },
          "success": {
            "trigger": "fetch"
          }
        },
        "fetch": {
          "type": "$network.request",
          "options": {
            "url": "https://jasonbase.com/things/jYJ.json"
          },
          "success": {
            "type": "$render"
          }
      },
  ...
}
3. Return from subroutine when finished
We saw from above that actions can trigger other actions.
But so far these action call chain examples have been one-way trip only, which means once an action triggers another action its life is over.
You can't do things like making a call and waiting for it to return with its result, and then continue on where it left off, using that value.
Let's look at the refresh example from above:
{
  "$jason": {
    "head": {
      "actions": {
        "refresh": {
          "type": "$cache.set",
          "options": {
            "items": []
          },
          "success": {
            "trigger": "fetch"
          }
        },
        "fetch": {
          "type": "$network.request",
          "options": {
            "url": "https://jasonbase.com/things/jYJ.json"
          },
          "success": {
            "type": "$render"
          }
        }
        ...
      }
  ...
}
The problem with this is each action does more than one thing:
refreshresets the cache AND triggers fetchfetchmakes a network request AND renders the result.
Maybe we want to add another action that resets the cache before doing something. Then, we need to add the same $cache.set action again.
Maybe we want to make the network request but do something else with the result instead of rendering.
It becomes difficult to reuse these actions since one action does more than one thing.
To solve this problem, we can break these actions out into self-contained modules so that:
- One action only does one thing.
- Each action ends by returning its result instead of triggering another action using
$return.successor$return.erroractions.
Here's the solution:
{
  "$jason": {
    "head": {
      "actions": {
        "reset": {
          "type": "$cache.set",
          "options": {
            "items": []
          },
          "success": {
            "type": "$return.success"
          }
        },
        "refresh": {
          "trigger": "reset",
          "success": {
            "trigger": "fetch",
            "success": {
              "type": "$render"
            }
          }
        },
        "fetch": {
          "type": "$network.request",
          "options": {
            "url": "https://jasonbase.com/things/jYJ.json"
          },
          "success": {
            "type": "$return.success"
          }
        }
        ...
      }
  ...
}
Here, the reset action only resets the cache.
And fetch action only makes a network request and returns its result. (No $render)
Lastly the refresh action functions as the main program that triggers each action one after another (triggers reset, then triggers fetch, and finally executes $render)
When to use trigger vs. defining actions inline
In most cases it's recommended that you define your actions under actions registry and trigger them using "trigger".
For example, instead of:
{
  "$jason": {
    "head": {
    },
    "body": {
      "sections": [{
        "items": [{
          "type": "label",
          "text": "item 1",
          "action": {
            "type": "$util.banner",
            "options": {
              "title": "Banner",
              "description": "Pressed item"
            }
          }
        }, {
          "type": "label",
          "text": "item 2",
          "action": {
            "type": "$util.banner",
            "options": {
              "title": "Banner",
              "description": "Pressed item"
            }
          }
        }, {
          "type": "label",
          "text": "item 3",
          "action": {
            "type": "$util.banner",
            "options": {
              "title": "Banner",
              "description": "Pressed item"
            }
          }
        }]
      }]
    }
  }
}
You may want to define the action inside head.actions, like this:
{
  "$jason": {
    "head": {
      "actions": {
        "show_banner": {
          "type": "$util.banner",
          "options": {
            "title": "Banner",
            "description": "Pressed item"
          }
        }
      }
    },
    "body": {
      "sections": [{
        "items": [{
          "type": "label",
          "text": "item 1",
          "action": {
            "trigger": "show_banner"
          }
        }, {
          "type": "label",
          "text": "item 2",
          "action": {
            "trigger": "show_banner"
          }
        }, {
          "type": "label",
          "text": "item 3",
          "action": {
            "trigger": "show_banner"
          }
        }]
      }]
    }
  }
}
Benefit 1
As you can see above, using trigger lets you define a single action once and reuse it from multiple places in your view. It removes redundant code.
Benefit 2
When you define an action inline, its behavior is fixed. For example, the show_banner action example above only does one thing: It displays a banner that says "Pressed item".
However in many cases we want to write one action and reuse them for various purposes. Maybe we want to display a banner that says "Pressed item 1", or "Pressed item 2".
{
  "$jason": {
    "head": {
      "actions": {
        "show_banner": {
          "type": "$util.banner",
          "options": {
            "title": "Banner",
            "description": "Pressed item {{$jason.item}}"
          }
        }
      }
    },
    "body": {
      "sections": [{
        "items": [{
          "type": "label",
          "text": "item 1",
          "action": {
            "trigger": "show_banner",
            "options": {
              "item": "1"
            }
          }
        }]
      }]
    }
  }
}
Declaring actions
There are two ways you can call actions:
Attach action attributes directly to UI elements
Define actions inside $jason.head.actions and call them by name
Inline Action
Inline actions are basically what we've been talking about so far. You directly attach an action to events, UI components, and another action. Here's an example:
{
  ...
  "type": "label",
  "action": {
    "type": "$util.banner",
    "options": {
      "title": "Hello",
      "description": "World"
    }
  }
  ...
}
Action Registry
We can define an action once and refer to them whenever we need to, instead of writing one for every situation.
■ Comparison with inline actions
For example, here's an inline action example. We display multiple items, and each item has the same action attribute content.
{
  "$jason": {
    "head": {
      ...
    },
    "body": {
      "sections": [{
        "items": [{
          "type": "label",
          "text": "This is row 1",
          "action": {
            "type": "$network.request",
            "options": {
              "url": "https://jasonclient.org/submit",
              "method": "POST"
            },
            "success": {
              "type": "$render"
            }
          }
        }, {
          "type": "label",
          "text": "This is row 2",
          "action": {
            "type": "$network.request",
            "options": {
              "url": "https://jasonclient.org/submit",
              "method": "POST"
            },
            "success": {
              "type": "$render"
            }
          }
        }, {
          "type": "label",
          "text": "This is row 3",
          "action": {
            "type": "$network.request",
            "options": {
              "url": "https://jasonclient.org/submit",
              "method": "POST"
            },
            "success": {
              "type": "$render"
            }
          }
        }]
      }]
    }
  }
}
Below we have the same example, but using $jason.head.actions instead of re-defining the same action every time inline:
{
  "$jason": {
    "head": {
      ...
      "actions": {
        "submit_item": {
          "type": "$network.request",
          "options": {
            "url": "https://jasonclient.org/submit",
            "method": "POST"
          },
          "success": {
            "type": "$render"
          }
        }
      }
    },
    "body": {
      "sections": [{
        "items": [{
          "type": "label",
          "text": "This is row 1",
          "action": {
            "trigger": "submit_item"
          }
        }, {
          "type": "label",
          "text": "This is row 2",
          "action": {
            "trigger": "submit_item"
          }
        }, {
          "type": "label",
          "text": "This is row 3",
          "action": {
            "trigger": "submit_item"
          }
        }]
      }]
    }
  }
}
Here's what's going on:
- Declare an action under
$jason.head.actions(in this case we've named itsubmit_item). - Then we
triggerthe action from anywhere using the name.
■ System events
Some actions are automatically triggered by the system when a certain event occurs. When you wish to take advantage of these, simply add them to actions. They are:
1. $load
$load gets called once automatically when the view loads for the first time.
Here's an example where we make a network request when the view loads, and then render the response using the template.
{
  ...
  "$load": {
    "type": "$network.request",
    "options": {
    "url": "http://jasonclient.org/req.json"
    },
    "success": {
    "type": "$render"
    }
  }
  ...
}
2. $show
$show gets called automatically whenever the view appears. For example when coming back from a modal view, coming back from its next view via back button, etc.
Here's an example
{
  ...
  "$show": {
    "type": "$reload"
  },
  ...
}
3. $foreground
$foreground is called automatically whenever the app comes back from the background state.
{
  ...
  "$foreground": {
    "type": "$reload"
  },
  ...
}
4. $pull
$pull gets called whenever user makes a pull to refresh action
{
  ...
  "$pull": {
    "type": "$reload"
  },
  ...
}
API
── REQUIRE ──
$require
The $require action imports remote JSON files in parallel.
{
  "type": "$require",
  "options": {
    "profiles": ["https://...", "https://...", "https://"],
    "items": ["https://...", "https://...", "https://..."]
  },
  "success": {
    "type": "$render"
  }
}
It works similar to $network.request but with a few differences:
- It can fetch multiple remote JSON files in parallel.
- It is only for making simple
GETrequests. No POST/PUT/DELETE requests, etc.
■ options
The options object defines what the return value should look like. For example, the following $require action would fetch the contents of https://hello.world/1.json and then attach it to the profile attribute.
{
  "type": "$require",
  "options": {
    "profile": "https://hello.world/1.json"
  }
}
When you chain this action with another action, you should be able to access the contents of https://hello.world/1.json via {{$jason.profile}}.
The value in the key/value pair can take the form of:
-
a single url:
"profile": "https://..." -
an array of urls:
"profiles": ["https://...", "https://...", "https://..."]
■ return value
returns the constructed options object.
For example, let's say https://blahblah.blah/1.json and https://blahblah.blah/2.json each contained the following JSON files respectively:
{
  "items": ["abc", "def", "ghi"]
}

{
  "items": ["cba", "fed", "ihg"]
}
We can fetch them in parallel like this:
{
  "type": "$require",
  "options": {
    "items1": "https://blahblah.blah/1.json",
    "items2": "https://blahblah.blah/2.json"
  },
  "success": {
    "type": "$render"
  }
}
As a result, when we are ready to $render, the $jason value will be:
{
  "items1": {
    "items": ["abc", "def", "ghi"]
  },
  "items2": {
    "items": ["cba", "fed", "ihg"]
  }
}
■ note
Unlike $set or $cache.set, the $require action on its own doesn't persist the data in any way.
So if you want to persist them to a local variable or a cache variable, you will need to chain the result to these actions and take care of assignment that way. Here's an example:
{
  "type": "$require",
  "options": {
    "profiles": ["https://...", "https://...", "https://"]
  },
  "success": {
    "type": "$set",
    "options": {
      "profiles": "{{$jason.profiles}}"
    }
  }
}
── FUNCTIONAL ──
Just like functions in any other programming language, you can call an action from an action, wait for it to return, and use the return value to continue where it left off.
$lambda
Call another action by name (This is how trigger is implemented internally)
{
  "type": "$lambda",
  "options": {
    "name": "refresh",
    "options": {
      "url": "https://jasonbase.com/things/3nf.json"
    }
  },
  "success": {
    "type": "$render"
  },
  "error": {
    "type": "$util.banner",
    "options": {
      "title": "Error",
      "description": "Something went wrong"
    }
  }
}
Above code is the same as:
{
  "trigger": "refresh",
  "options": {
    "url": "https://jasonbase.com/things/3nf.json"
  },
  "success": {
    "type": "$render"
  },
  "error": {
    "type": "$util.banner",
    "options": {
      "title": "Error",
      "description": "Something went wrong"
    }
  }
}
In most cases you may want to use trigger but sometimes it's useful to use $lambda directly, for example if you want to dynamically trigger different actions. Example:
{
  "type": "$lambda",
  "options": {
    "name": "{{action_name}}",
    "options": {
      "url": "https://jasonbase.com/things/3nf.json"
    }
  },
  ...
}
■ options
- name: the name of the action to trigger, registered under actions registry
- options: options object to pass to the next action
■ return value
- Whatever the triggered action returns via $return.success or $return.error
$return.success
Unless you explicitly call $return.success or $return.error, all triggered actions terminate when they reach the end of the call chain.
To return to the action which called the current action with a success state, we need to use $return.success.
Then the caller action will resume where it left off and keep executing its success action.
■ options
- The return value to pass back to the caller action. If not specified, it automatically returns the current
$jasonvalue
■ no success or error of its own
none: Since$return.successis an action solely designed for returning the control back to the caller action,$return.successitself does not havesuccessorerroractions.
■ example
In the example below, the display_banner triggers fetch, and then displays a banner using the return value $jason.
Notice how the $lambda action's success takes over after the fetch action returns via $return.success.
{
  "display_banner": {
    "type": "$lambda",
    "options": {
      "name": "fetch"
    },
    "success": {
      "type": "$util.banner",
      "options": {
        "title": "The number of items:",
        "description": "{{$jason.items.length}}"
      }
    }
  },
  "fetch": {
    "type": "$network.request",
    "options": {
      "url": "https://jasonbase.com/things/3nf.json"
    },
    "success": {
      "type": "$return.success",
      "options": {
        "items": "{{$jason}}"
      }
    }
  }
}
Again, this is the same as using trigger:
{
  "display_banner": {
    "trigger": "return_homer_simpson",
    "success": {
      "type": "$util.banner",
      "options": {
        "title": "The number of items:",
        "description": "{{$jason.items.length}}"
      }
    }
  },
  "fetch": {
    "type": "$network.request",
    "options": {
      "url": "https://jasonbase.com/things/3nf.json"
    },
    "success": {
      "type": "$return.success",
      "options": {
        "items": "{{$jason}}"
      }
    }
  }
}
$return.error
Pretty much the same as $return.success, except that it returns the control back to the caller action's error action.
──── VIEW ────
Actions related to drawing views
$reload
Refreshes the view completely by re-fetching content from the current URL.
{
  "items": [{
    "type": "label",
    "text": "Refresh",
    "action": {
      "type": "$reload"
    }
  }]
}
■ options
- none
■ return value
- none
This will reload the page when a user taps on the item.
$render
Renders a template with data
■ options
data: Data to render. If not specified, it's the$jasonvalue at the point$renderwas called.template: Template name to render. If not specified, it will look for$jason.head.templates.bodytype:"html"|"json"(Default isjson. See html templating to learn more about how to render an HTML string natively using Jason)
■ return value
- none
■ example
Rendering return value from the previous action
By default $render renders the data returned from its previous action.
{
  "type": "$network.request",
  "options": {
    "url": "https://jasonbase.com/things/gbe.json"
  },
  "success": {
    "type": "$render"
  }
}
For example, let's say the network request returns the following result:
{
    "name": "Mr. Fisherman",
    "image": "http://i.giphy.com/OmK8lulOMQ9XO.gif",
    "status": "Busy fishing on the iPhone"
}
All Jasonette actions store their return values under $jason object when they return.
So we can access above value using the $jason variable.
Here's how we would write the body template:
{
  "$jason": {
    "head": {
      ...
      "templates": {
        "body": {
          "sections": [{
            "items": [{
              "type": "image",
              "url": "{{$jason.image}}"
            }, {
              "type": "label",
              "text": "{{$jason.text}}"
            }, {
              "type": "label",
              "text": "{{$jason.status}}"
            }]
          }]
        }
      ...
  }
}
Specifying data when rendering
In most cases you will use the above method--rendering data passed in as a return value from the previous action.
However, you can also use $render as standalone, by manually specifying its data, like this (You rarely need to use this method):
{
  "type": "$render",
  "options": {
    "data": [{
      "name": "Ethan",
      "id": "1"
    }, {
      "name": "Jason",
      "id": "2"
    }, {
      "name": "Jasonette",
      "id": "3"
    }]
  }
}
Rendering the body template
In most cases you will use $render without manually specifying the template, because it will assume you're rendering the body template. For example, a typical $render looks like this:
{
  "type": "$network.request",
  "options": {
    "url": "https://jasonclient.com/req.json"
  },
  "success": {
    "type": "$render"
  }
}
If no template option is specified, $render will look for a body template inside $jason.head.templates and use that to render the data. For example, from the following JSON,
{
  "$jason": {
    "head": {
      "templates": {
        "body": {
          "sections": [{
            "items": {
              "{{#each $jason}}": {
                "type": "label",
                "text": "{{text}}"
              }
            }
          }]
        }
      ...
  }
}
When $render runs, it will take the JSON markup inside $jason.head.templates.body, render it using the data, onto the view.
Manually specifying the template to render
But sometimes you can also specify the template name. For example, we may want to render a template named empty instead of the default body template:
{
  "$jason": {
    "head": {
      "templates": {
        "body": {
          ....
        },
        "empty_template": {
          "sections": [{
            "items": [{
              "type": "label",
              "text": "Empty view"
            }]
          }]
        }
      ...
  }
}
In this case we could pass {"template": "empty_template"} as an option, like this:
{
  "type": "$network.request",
  "options": {
    "url": "https://jasonclient.com/req.json"
  },
  "success": {
    "type": "$render"
  },
  "error": {
    "type": "$render",
    "options": {
      "template": "empty_template"
    }
  }
}
How is $render different from $reload?
$render redraws an existing template you already downloaded, using dynamic data. $reload completely refreshes the current URL. Here's an example scenario:
- Jason view loads and fetches a JSON markup from the server (
main.json) main.jsonmakes an API request to Twitter to fetch Tweets. (https://api.twitter.com/1.1/statuses/user_timeline.json)- Then it renders the result using its
bodytemplate, which is under$jason.head.templates.bodyinmain.json. - From this point on, calling
$rendersimply takes the$jason.head.templates.bodywe have in memory, and renders whatever data we pass in. - However calling
$reloadwill make a full refresh, going back to step 1.
Conclusion
- In most cases, you call
$renderat the end of an action call chain, rendering the$jasonreturn value from its preceding action. - Also, in most cases
$renderis used without specifyingtemplateordataoptions.- Just don't forget to have a template under
$jason.head.templates.body, since$renderwill automatically render that.
- Just don't forget to have a template under
- Also, remember that you can access the return value using
$jasonfrom the template.
$snapshot
Takes a snapshot of the currently visible screen
■ options
- none
■ return value
The return value is in this format:
{
  "data": "....",
  "data_uri": "....",
  "content_type": "image/jpeg",
}
- Returns the snapshot as raw data under
dataattribute. - Also returns
data_uriattribute, which contains the data-uri - You can utilize the
databy passing it to another action using success - The
content_typeis"image/jpeg"
■ example
Take a snapshot and share
{
  "type": "$snapshot",
  "success": {
    "type": "$util.share",
    "options": {
      "items": [
        {
          "type": "image",
          "data": "{{$jason.data}}"
        }
      ]
    }
  }
}
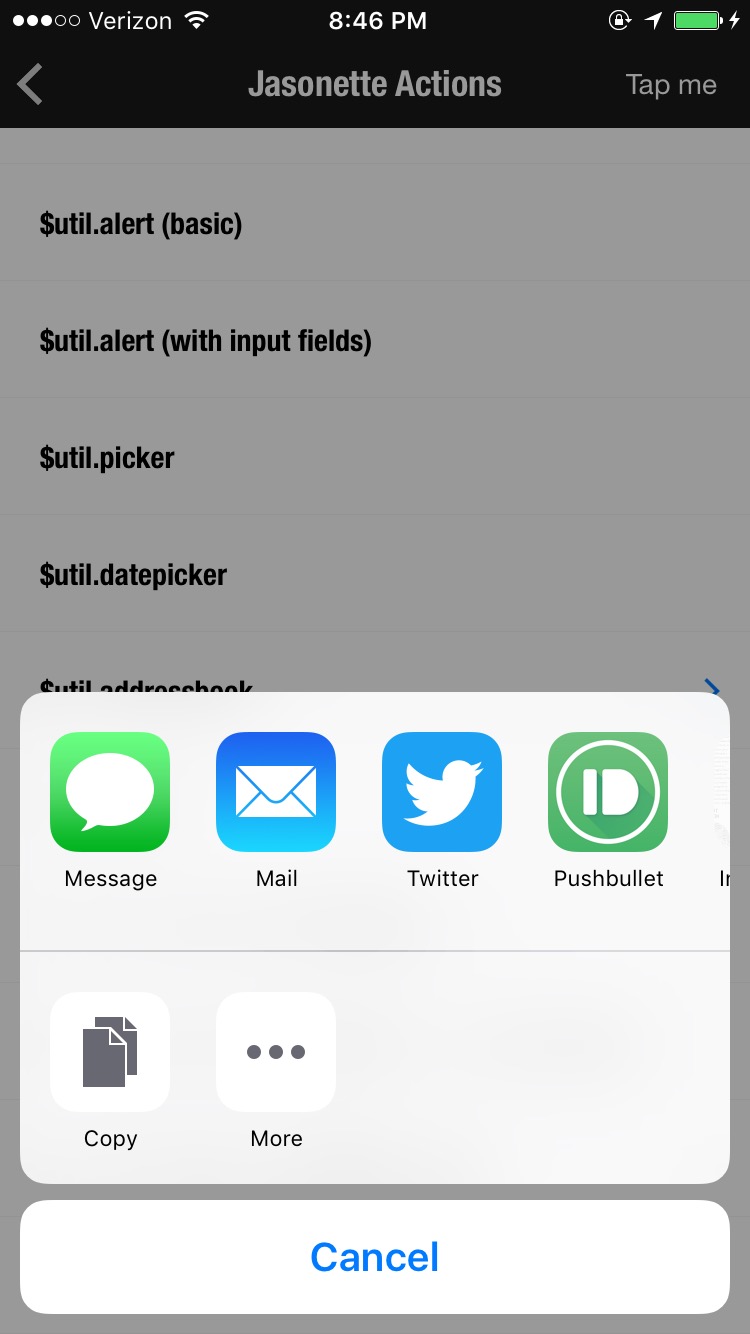
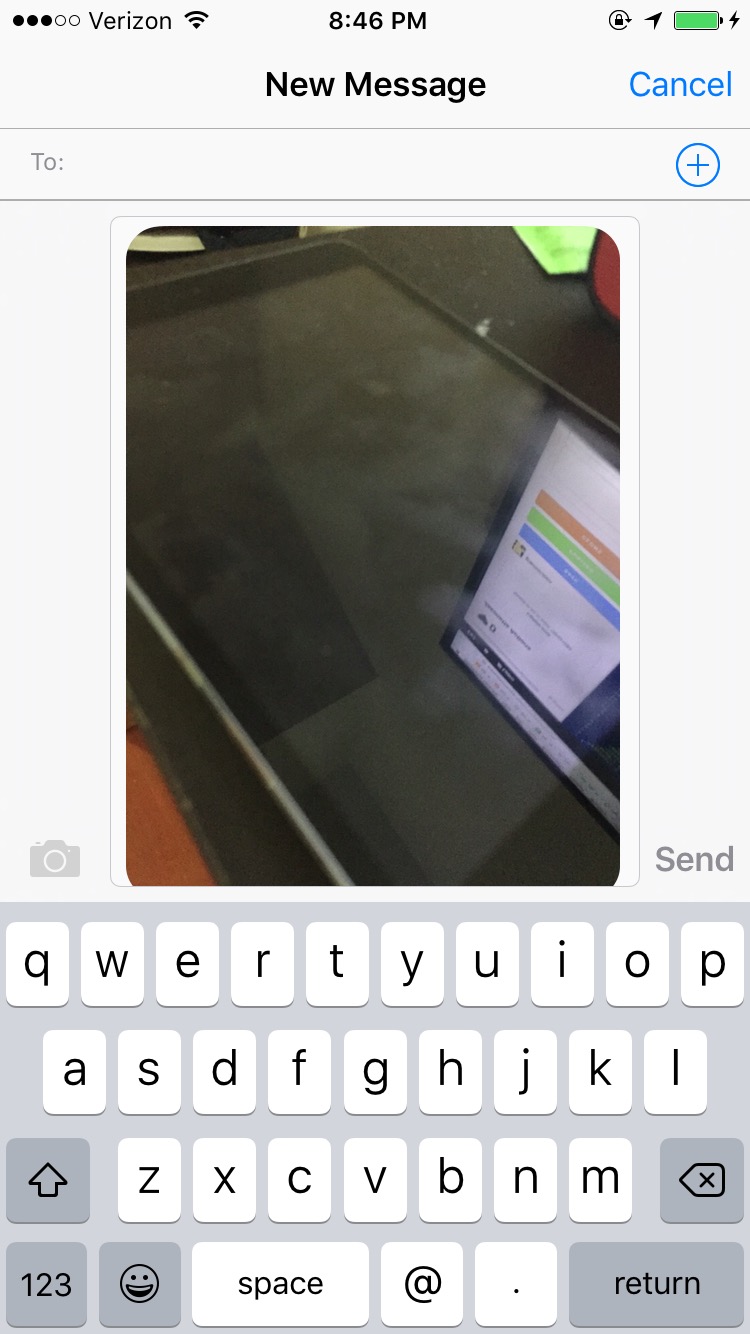
| Share sheet | SMS example |
|---|---|
 |
 |
$href
- An action version of href. Works the same way, but just another way to invoke href.
- Use this when a component doesn't support
hrefattribute directly but supports anaction. - Sometimes it's useful when you want to invoke
hrefwithout displaying a disclosure indicator. (href comes with a disclosure indicator by default)
■ options
It's the same set of attributes as href since it simply invokes the href when triggered.
url- the url to transition to
view- can be
"web"|"app"|"jason"(default)
- can be
options- Works the same way as the options object for href
transition- can be
"modal"|"fullscreen"|"push"(default)
- can be
preload- A preload JASON markup to render before the next view renders.
■ "success" callback
Normally when using the $href action, it just transitions to the next view.
However you can use the success callback to the $href action **along with $ok action to implement a 2-way communication between views. To learn more, read the $ok action.
- Note: Not supported for a regular href. Only supported for
$hrefaction.
■ return value
- none
■ example 1
{
   "type": "label",
   "text": "trigger href",
   "action": {
     "type": "$href",
     "options": {
       "url": "...",
       "transition": "...",
       "view": "..."
     }
   }
}
is same as:
{
   "type": "label",
   "text": "trigger href",
   "href": {
     "url": "...",
     "transition": "...",
     "view": "..."
   }
}
The only difference is: in case of items the second option displays a disclosure indicator since we're directly using href
■ example 2
This example opens Instagram app using its URL scheme
{
  "$jason": {
    "head": {
      "title": "Take a photo on instagram"
    },
    "body": {
      "sections": [
        {
          "items": [
            {
              "type": "label",
              "text": "Take a photo on Instagram",
              "action": {
                "type": "$href",
                "options": {
                  "url": "instagram://camera",
                  "view": "app"
                }
              }
            }
          ]
        }
      ]
    }
  }
}
■ example 3. Using preload
Preload lets you specify a JSON markup for the next view before the next view loads. This helps with smooth transition.
Here's an example:
{ "type": "$href", "options": { "url": "https://www.jasonbase.com/dhen3", "preload": { "background": "#ff0000", "layers": [{ "type": "image", "url": "file://loading.gif", "style": { "top": "50%-25", "left": "50%-25", "width": "50", "height": "50" } }] } } }
Notice that
- the
preloadcontains an entire view representation of a view. - it DOES NOT contain the
headpart. preload is purely for displaying a temp view until the real view loads.
$close
Close a modal (works when the currently view is a modal)
■ options
- none
■ return value
- none
$back
Transition one step back from the current view
- If the current view is a modal, it closes the current view
- Otherwise it slides back to the previous view
■ options
- none
■ return value
- none
$ok
Similar to $back, however allows for a return value. This means you can send back a return value to the previous view using $ok.
Here's how to get it to work:
1. Close the current view using $ok
Remember to attach the return value payload under options. Otherwise it's the same as $back.
{
  "type": "$ok",
  "options": {
    "selection": "Americano"
  }
}
2. The previous view processes the return value using the success callback
Two points:
- The caller view must have opened the closing view with an
$hrefaction. - The
$hrefaction must have asuccesscallback (Otherwise how would you process it?)
{
  "type": "$href",
  "options": {
    "url": "file://selection.json"
  },
  "success": {
    "type": "$util.alert",
    "options": {
      "title": "Selected",
      "description": "You have selected {{$jason.selection}}"
    }
  }
}
Notice that the options payload from the previous $ok action is accessible as $jason in the success callback.
$scroll
Programmatically scroll to top or bottom of a view
■ options
position:toporbottom
■ return value
- none
Example
{
  "type": "$scroll",
  "options": {
    "position": "bottom"
  }
}
Functional example
- Github Search with scroll feature: https://jasonbase.com/things/1KQB
── NETWORK ──
$network.request
Make GET/POST/PUT/DELETE network requests
■ options
url: The url to access.method:"get"|"post"|"put"|"delete"|"head"|"patch".data: Parameters to send along with the url (optional)header: Headers to attach to every request if any (optional)timeout: network request time out in seconds (optional).data_type: Specifies how the fetched response will be processed. Can bejson,html,rss, orraw.jsonassumes that the return value will be in JSON format, whereasrawexpects a plain text. You can userawtype when fetching a plain text or CSV.htmlis for fetching HTML content and especially required when you need to utilize HTML requests associated with cookies/sessions.rssis used to fetch RSS. The default isjson.content_type: Specifies which format the parameters will be sent as. By default it's sent as a form object, but in case you specify{"content_type": "json"}the data will be submitted as a JSON string.
■ return value
- Whatever the server returns
■ examples
Example 1. Simple JSON GET request
Here's a simple example of GET request, fetching JSON. We don't need to specify {"type": "get"} here since the default type is "get"
{
    "type": "$network.request",
    "options": {
        "url": "http://plasticfm.herokuapp.com/things/3.json"
    },
    "success": {
        "type": "$render"
    }
}
Example 2. More complex JSON requests
This time we're going to make a POST request, with all the data and header
{
  "type": "$network.request",
  "options": {
    "url": "http://www.jasonbase.com/messages.json",
    "method": "post",
    "data": {
      "user_id": "fI9",
      "message": "Hello there"
    },
    "header": {
      "auth_token": "fnekfla98dls9sNFK0nf3"
    }
  },
  "success": {
    "type": "$render"
  },
  "error": {
    "type": "$util.alert",
    "options": {
      "title": "Error",
      "description": "Uh oh, something went wrong"
    }
  }
}
Example 3. HTML GET request
You can also make HTML type requests. Here's a request with html data_type.
{
    "type": "$network.request",
    "options": {
        "url": "https://news.ycombinator.com/newest",
        "dataType": "html"
    },
    "success": {
        "type": "$render",
        "options": {
            "type": "html"
        }
    }
}
It fetches the url as html type, and then renders it using the html type parser. See templates for more details on how to render HTML content in Jasonette.
Example 4. HTML POST request with cookies
Dealing with cookies is simple. All you need to do is make the request to create a session. Jason will automatically store the returned cookie, and then attach it to all subsequent requests.
Here's an example of signing into a website by making an HTML data_type $network.request call:
{
  "type": "$network.request",
  "options": {
    "url": "https://news.ycombinator.com/login",
    "method": "post",
    "data": {
      "acct": "{{$get.username}}",
      "pw": "{{$get.password}}"
    },
    "data_type": "html"
  },
  "success": {
    "type": "$network.request",
    "options": {
      "url": "https://news.ycombinator.com/saved?id={{$get.username}}",
      "data_type": "html"
    },
    "success": {
      "type": "$render",
      "options": {
        "type": "html"
      }
    }
  }
}
- It first signs into the site by making a
POSTrequest of{"data_type": "html"}. Then it stores the cookie returned from the server. - Once the login succeeds, it makes a
GETrequest of{"data_type": "html"}to an actual content API. The cookie from the previous step is automatically applied to the request.
$network.upload
Upload data to cloud providers. Currently supports S3, but feel free to extend
■ options
type:"s3"(Currently only supports s3)bucket: s3 bucket namepath: the s3 path to upload the filesign_url: To upload files to s3, you need to acquire a signed url from S3 first, and then upload it to that URL.
■ return value
file_name: a randomly generated filename. When$network.uploadis called, it automatically generates a random, hashed filename to ensure uniqueness, and then stores the file onto the cloud provider with that name.- We need this attribute to keep track of the data we've just uploaded. For example, we may want to store the filename somewhere so we can access this file later.
■ example
This example takes a photo and uploads to S3.
{
  "type": "$media.camera",
  "options": {
    "quality": "0.4"
  },
  "success": {
    "type": "$network.upload",
    "options": {
      "type": "s3",
      "bucket": "fm.ethan.jason",
      "data": "{{$jason.data}}",
      "path": "",
      "sign_url": "https://imagejason.herokuapp.com/sign_url"
    },
    "success": {
      "type": "$network.request",
      "options": {
        "url": "https://imagejason.herokuapp.com/post",
        "method": "post",
        "data": {
          "bucket": "fm.ethan.jason",
          "path": "/",
          "filename": "{{$jason.filename}}"
        }
      },
      "success": {
        "type": "$reload"
      }
    }
  }
}
Here's what's going on above:
1. The client takes a photo using the $media.camera action and passes the raw data to $network.upload as $jason.
2. The $network.upload first looks at options.sign_url and makes a request to get the signed url.
3. The server should return a signed url for S3.
The
sign_urlattribute is the URL to your server, and your server should generate a signed url and return the result in the following format:{ "$jason": "https://s3.amazonaws.com/...../...?AWSAccessKeyId=.....&Expires=.....&Signature=....."}
See the full server side code to learn how to generate signed urls.
4. The client then uploads the content passed in as data to the just generated signed url, using a randomly generated filename.
5. Once the upload finishes, the $network.upload returns the filename generated from step 3.
6. Then it stores the filename to our server by making a POST $network.request to https://imagejason.herokuapp.com/post
Check out the full code on Github:
── SESSION ──
Check out a functional demo app with backend server, with user accounts
$session.set
$session.settakes care of token authentication to authenticate into any mobile API.- You need to call
$session.setafter a$network.requestaction to an authentication endpoint, which returns an authentication token. - Sessions are tied to domain, which means as long as you authenticate with a domain, all other URLs under the same domain will use the same token therefore you won't need to re-authenticate for every URL under the same domain.
- For cookie based HTML authentication, see Example 4 from
$network.requestabove.
■ options
domain: the domain to set the session for (example: "jasonbase.com")header: headers to attach to every future$network.requestto the specified domain.body: body parameters to attach to every future$network.requestto the specified domain.
■ return value
- none
■ example
Here's an example:
"action": {
  "type": "$network.request",
  "options": {
    "url": "https://sessionjason.herokuapp.com/users/sign_in.json",
    "method": "post",
    "data": {
      "user[email]": "{{$get.email}}",
      "user[password]": "{{$get.password}}"
    }
  },
  "success": {
    "type": "$session.set",
    "options": {
      "domain": "sessionjason.herokuapp.com",
      "header": {
        "X-User-Email": "{{$jason.email}}",
        "X-User-Token": "{{$jason.authentication_token}}"
      }
    },
    "success": {
      "type": "$href",
      "options": {
        "url": "https://sessionjason.herokuapp.com/posts.json",
        "transition": "replace"
      }
    }
  },
  "error": {
    "type": "$util.banner",
    "options": {
      "title": "Enter credentials",
      "description": "Please enter both email and password"
    }
  }
}
Let's walk through each step.
The first action is $network.request. It makes a POST request to https://sessionjason.herokuapp.com/users/sign_in.json, to which the server returns the following JSON as a response:
{
  "id":2,
  "email":"ethan@ethan.fm",
  "created_at":"2016-10-14T22:55:00.664Z",
  "updated_at":"2016-10-15T05:22:41.730Z",
  "authentication_token":"fnekz4hf7ghw95m6ks0rf01j"
}
Next, we proceed to the next action, which is $session.set. Here we use the return value from the $network.request and set the header.
This stores the header object for the specified domain (session.herokuapp.com), and this stored header will be attached to all future $network.request to this domain. The header to be stored will look like this:
{
  "header": {
    "X-User-Email": "ethan@ethan.fm",
    "X-User-Token": "fnekz4hf7ghw95m6ks0rf01j"
  }
}
After the $session.set, it goes to the next action $href. This transitions to https://sessionjason.herokuapp.com/posts.json.
This time, the network request will automatically attach the stored header to the request.
The server will recognize the authentication token and respond with the actual posts.json.
$session.reset
This action lets you clear sessions for a specified domain. Can be used for both token authentication and web authentication via cookies
- For token authentication, it clears your headers and body parameters objects tied to the domain, created through $session.set.
- For web requests (html), it clears your cookie tied to the domain, created through
htmltype$network.request, as described here.
■ options
url: The url from which to sign out.domain: The domain from which to sign out (used for APIs)data: Parameters to send along with the url (optional)type:"html"|"json"(Default is "json")
■ examples
Example 1. Signing out of token authentication
No need to specify type, since it's json by default.
{
    "type": "$session.reset",
    "options": {
    "domain": "sessionjason.herokuapp.com"
    },
    "success": {
        "type": "$reload"
    }
}
■ return value
- none
Example 2. Signing out of a website by clearing cookies
Just set the options.type as html.
{
    "type": "$session.reset",
    "options": {
        "domain": "http://news.ycombinator.com",
        "type": "html"
    },
    "success": {
        "type": "$reload"
    }
}
Check out a functional demo app with backend server, with user accounts
── VARIABLE ──
Use $set and $get to set and get local variables.
Local variables are valid only within the current view and only stays on the memory.
$set
Set local variables.
■ options
- key:value pairs. The key is the variable name, and the value is the variable's value.
■ return value
- none
■ example
In the following example, the $set action sets the value of the two local variables firstname and lastname as ethan and gliechtenstein, respectively.
{
  "type": "$set",
  "options": {
    "firstname": "ethan",
    "lastname": "gliechtenstein"
  }
}
This is how you set a variable. We are setting local variables firstname and lastname to ethan and gliechtenstein respectively.
do something after setting the local variable
If you're using a local variable in your body template and wish to update the view to reflect the updated local variable, you need to call $render.
For example you can add a success attribute to above action to redraw the view after update, like this:
{
  "type": "label",
  "text": "{{$get.firstname}} {{$get.lastname}}",
  "action": {
    "type": "$set",
    "options": {
      "firstname": "ethan",
      "lastname": "gliechtenstein"
    },
    "success": {
      "type": "$render"
    }
  }
}
$get
You can access local variables by using a template expression {{$get.VARIABLE_NAME}}
- Normally, the usage flow is:
- Set a variable using
$setaction - Use the variable from template through
{{$get.VARIABLE_NAME}}expression.
- Set a variable using
■ example
Once you set firstname and lastname like we did above, we can use them like this:
[
  {
    "type": "label",
    "text": "{{$get.firstname}}"
  },
  {
    "type": "label",
    "text": "{{$get.lastname}}"
  }
]
Here's a full usage example using both $set action and $get expression.
{
  "$jason": {
    "head": {
      "actions": {
        "$load": {
          "type": "$set",
          "options": {
            "bar": "#"
          },
          "success": {
            "type": "$render"
          }
        },
        "$pull": {
          "type": "$set",
          "options": {
            "bar": "{{$get.bar+'#'}}"
          },
          "success": {
            "type": "$render"
          }
        }
      },
      "templates": {
        "body": {
          "sections": [{
            "items": [{
              "type": "label",
              "text": "{{$get.bar}}"
            }]
          }]
        }
      }
    }
  }
}
Here's what's going on:
- When the view loads (
$loadsystem event), it sets the local variablebar's value as "#", then renders the template with a label that displays the variablebar({{$get.bar}}). - When the user makes a pull to refresh gesture (
$pullevent), it appends another "#" tobarand then renders again.
── CACHE ──
Cache lets you persist and retrieve content. Unlike local variables, it will stay even when you close the app and come back.
Cache vs. Local variable
- Cache and local variables are both sandboxed per view url. Therefore anything you store to cache and local variable is stored just for that view.
- Local variables are only on memory so will go away when the view refreshes. But cache is stored persistently and stays until you overwrite or reset it, even if the app is killed and restarted.
Write
$cache.set action is used to store to cache.
■ options
- key:value pairs. The key is the cache variable name, and the value is the variable's value.
■ return value
returns the updated $cache object, which looks like this:
{
  "items": [...]
}
■ examples
Example 1. Set cache
In the following example, it first makes a $network.request, and then takes its return value {{$jason}} and stores it to cache using the $cache.set action.
{
  "type": "$network.request",
  "options": {
    "url": "http://jasonclient.org/api/items.json"
  },
  "success": {
    "type": "$cache.set",
    "options": {
      "items": "{{$jason}}"
    }
  }
}
Example 2. Set cache and use the updated value
Simply setting the cache doesn't update the view. Let's try to render the updated result.
{
  "type": "$network.request",
  "options": {
    "url": "http://jasonclient.org/api/items.json"
  },
  "success": {
    "type": "$cache.set",
    "options": {
      "items": "{{$jason}}"
    },
    "success": {
      "type": "$util.alert",
      "options": {
        "title": "Items fetched",
        "description": "{{$cache.items.length}}"
      }
    }
  }
}
Read
Directly access $cache variable from a template expression, for example {{$cache.items}}.
■ example
For example, you could store a tracking_keyword value locally and automatically perform a search whenever the document loads.
{
  "type": "$oauth.request",
  "options": {
    "url": SEARCH_URL,
    "data": {
      "search_query": "{{$cache.tracking_keyword}}"
    }
  }
}
Reset
Use $cache.reset action to reset the cache associated with the current url.
■ options
- none
■ return value
- none
■ example
The following will wipe out all the cache values associated with the current view url.
{
  "type": "$cache.reset"
}
── GLOBAL ──
In most cases it is recommended to use $cache to persist data, because they are sandboxed per URL and it's secure.
But sometimes you may want to store variables globally so they're accessible from all the views.
This is what global variable does. Just like $cache, it will stay even when you close the app and come back later.
Global vs. Cache vs. Local Variables
- Cache is sandboxed per URL, but Global variables are global to the entire app.
- Both Global and Cache persist data so they will stick around unless you delete the app or explicitly delete them using
$cache.resetor$global.reset.
Write
$global.set action is used to write to global variables.
■ options
- key:value pairs. The key is the global variable name, and the value is the variable's value.
■ return value
returns the updated $global object, which looks like this:
{
  "key1": [...],
  "key2": ...
}
■ examples
Example 1. Set global
In the following example, it first makes a $network.request, and then takes its return value {{$jason}} and stores it to global using the $global.set action.
{
  "type": "$network.request",
  "options": {
    "url": "http://jasonclient.org/api/items.json"
  },
  "success": {
    "type": "$global.set",
    "options": {
      "items": "{{$jason}}"
    }
  }
}
Example 2. Set global and use the updated value
Simply setting the global doesn't update the view. Let's try to render the updated result.
{
  "type": "$network.request",
  "options": {
    "url": "http://jasonclient.org/api/items.json"
  },
  "success": {
    "type": "$global.set",
    "options": {
      "items": "{{$jason}}"
    },
    "success": {
      "type": "$render",
      "success": {
        "type": "$util.alert",
        "options": {
          "title": "Items fetched",
          "description": "{{$global.items.length}}"
        }
      }
    }
  }
}
Read
Just like $cache, you can read global variables using template expressions:
■ example
For example, you could store $get.message (local variable) into a global variable named url, and then display a $util.alert with the global variable we just set, like this:
{
  "$jason": {
    "head": {
      "actions": {
        ...
        "store": {
          "type": "$global.set",
          "options": {
            "url": "{{$get.message}}"
          },
          "success": {
            "type": "$util.alert",
            "options": {
              "title": "Current global 'url' variable",
              "description": "{{$global.url}}"
            }
          }
        },
        ...
      },
      ...
    }
  }
}
Example: Use a modal to set global and render the result
The following JSON opens file://2.json.
{
  "$jason": {
    "head": {
      "title": "Global Test 1",
      "actions": {
        "$show": {
          "type": "$render"
        },
        "$pull": {
          "type": "$reload"
        }
      },
      "templates": {
        "body": {
          "sections": [
            {
              "type": "vertical",
              "items": [
                {
                  "type": "button",
                  "text": "{{$global.something || 'Set Global'}}",
                  "action": {
                    "type": "$href",
                    "options": {
                      "url": "file://2.json",
                      "transition": "modal"
                    }
                  }
                }
              ]
            }
          ]
        }
      }
    }
  }
}
Here's the contents of 2.json.
{
  "$jason": {
    "head": {
      "title": "Global Test 2",
      "actions": {
        "$show": {
          "type": "$render"
        },
        "$pull": {
          "type": "$reload"
        },
        "save": {
          "type": "$global.set",
          "options": {
            "something": "{{$get.something}}"
          },
          "success": {
            "type": "$close"
          }
        }
      },
      "templates": {
        "body": {
          "header": {
            "menu": {
              "text": "Reset",
              "style": {
                "size": "15",
                "font": "Helvetica",
                "color": "#4f8ff7"
              },
              "action": {
                "type": "$global.reset",
                "options": {
                  "items": ["something"]
                },
                "success": {
                  "type": "$close"
                }
              }
            }
          },
          "sections": [{
            "type": "vertical",
            "items": [{
                "type": "label",
                "text": "Global value is: {{$global.something || ''}}"
              },
              {
                "type": "vertical",
                "style": {
                  "padding": "10"
                },
                "components": [{
                  "type": "textfield",
                  "name": "something",
                  "value": "{{$global.something || ''}}",
                  "placeholder": "Add something here"
                }]
              },
              {
                "type": "button",
                "text": "Save Global Variable",
                "action": {
                  "trigger": "save"
                }
              }
            ]
          }]
        }
      }
    }
  }
}
Reset
Use $global.reset action to remove global variables by name
■ options
items: An array of global variable names to remove
■ return value
- The resulting
$globalobject after removing the variables
■ example
The following will wipe out all the global variables named key1 and key2.
{
  "type": "$global.reset",
  "items": ["key1", "key2"]
}
── SCRIPT ──
Jasonette lets you use simple inline JavaScript code inside template expressions. Here's an example where we use JSON.stringify:
{
  "items": [
    {
      "type": "label",
      "url": "Full JSON string"
    },
    {
      "type": "label",
      "text": "{{JSON.stringify($jason)}}"
    }
  ]
}
However sometimes you may want to import an entire JavaScript library, just like you do with HTML using the <script> tag.
$script.include
Include remote/local JavaScript file into the template context.
■ options
items: An array of include objects, each of which has the following attributes:url: load from a url. You can use both remote (http:// or https://) or local (file://) urlstext: inline JavaScript code to import
■ return value
- none
■ example
In the following example, we:
- import underscore.js, crypto.js, he.js, as well as inject an inline JavaScript code into the context via
textattribute. - Use it by accessing the
$rootcontext. The JavaScript libraries get injected into the global context ($root) after running$script.include.
Note that these JavaScript libraries referenced by url are downloaded in parallel just like how $require action works.
{
  "type": "$script.include",
  "options": {
    "items": [
      { "url": "https://cdnjs.cloudflare.com/ajax/libs/underscore.js/1.8.3/underscore-min.js" },
      { "text": "var randomcolor = function() { return '#'+Math.floor(Math.random()*16777215).toString(16); }" },
      { "url": "https://cdnjs.cloudflare.com/ajax/libs/crypto-js/3.1.9-1/crypto-js.min.js" },
      { "url": "https://rawgit.com/mathiasbynens/he/master/he.js" }
    ]
  },
  "success": {
    "type": "$render",
    "options": {
      "data": {
        "raw": "no man&s land",
        "decoded": "{{$root.he.decode('no man's land')}}",
        "unique": "{{$root._.uniq([1,2,3,3,3,4,4,4,4,5])}}"
      }
    }
  }
}
$script.clear
Clears out the global context of the JavaScript template engine.
■ options
- none
■ return value
- none
■ example
{
  "type": "$script.clear"
}
── UTIL ──
Utility and widget methods
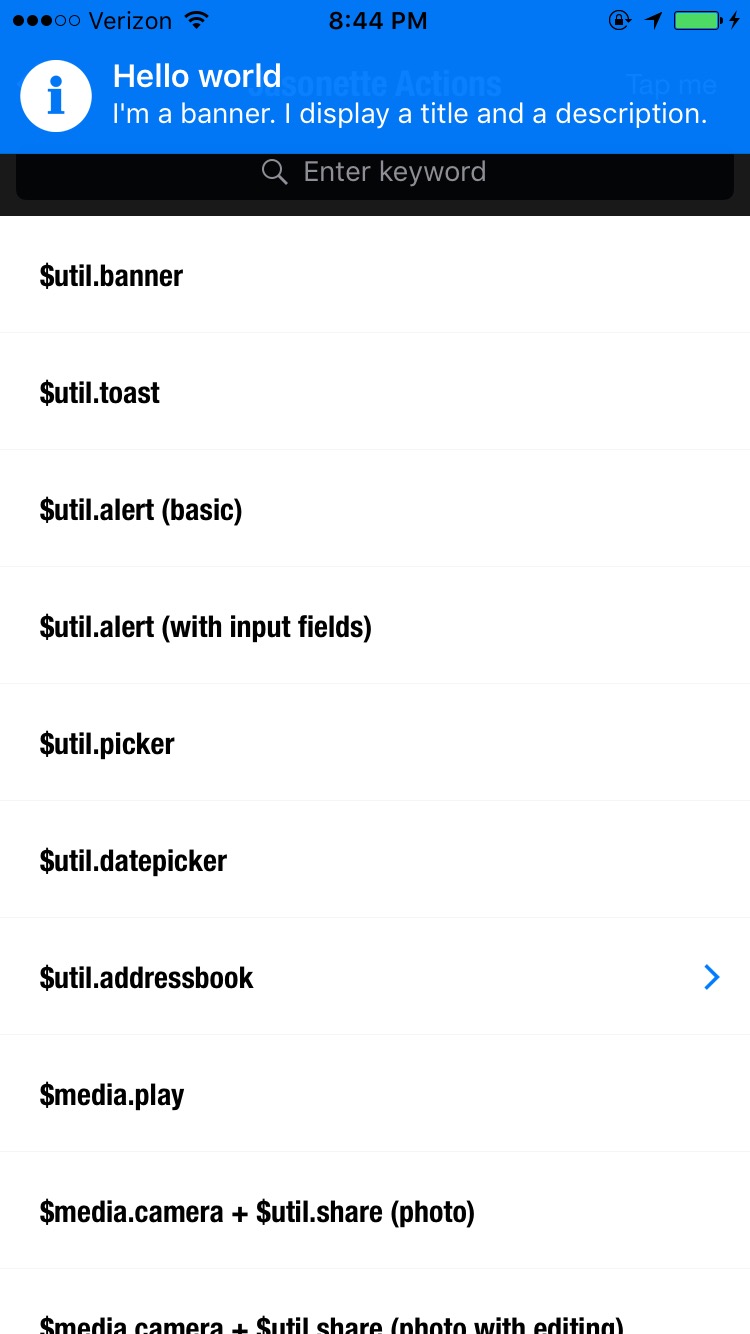
$util.banner
Displays a banner notification with title and description.
■ options
titledescriptiontype:"error"|"success"|"info"(default)
■ return value
- none
■ example
{
    "type": "$util.banner",
    "options": {
        "title": "Hello World",
        "description": "I'm a banner. I display a title and a description",
        "type": "info"
    }
}
$util.toast
Displays a toast notification with a simple text

■ options
text: The text to displaytype:"error"|"info"|"warning"|"dark"|"default"|"success"(default)
■ return value
- none
■ example
{
    "type": "$util.toast",
    "options": {
        "text": "I'm a toast. I display a simple text.",
        "type": "warning"
    }
}
$util.alert
- Displays an alert.
- Alerts can also have form input fields users can fill in.
- When you use the form input,
$util.alertreturns the resulting key/value pairs wrapped with$jason.
Types of alerts
- Basic : You can just display a simple alert that has an ok and a cancel button.
- Form : You can also add input fields to the alert and use it to receive user input.
| Basic Alert | Form Alert |
|---|---|
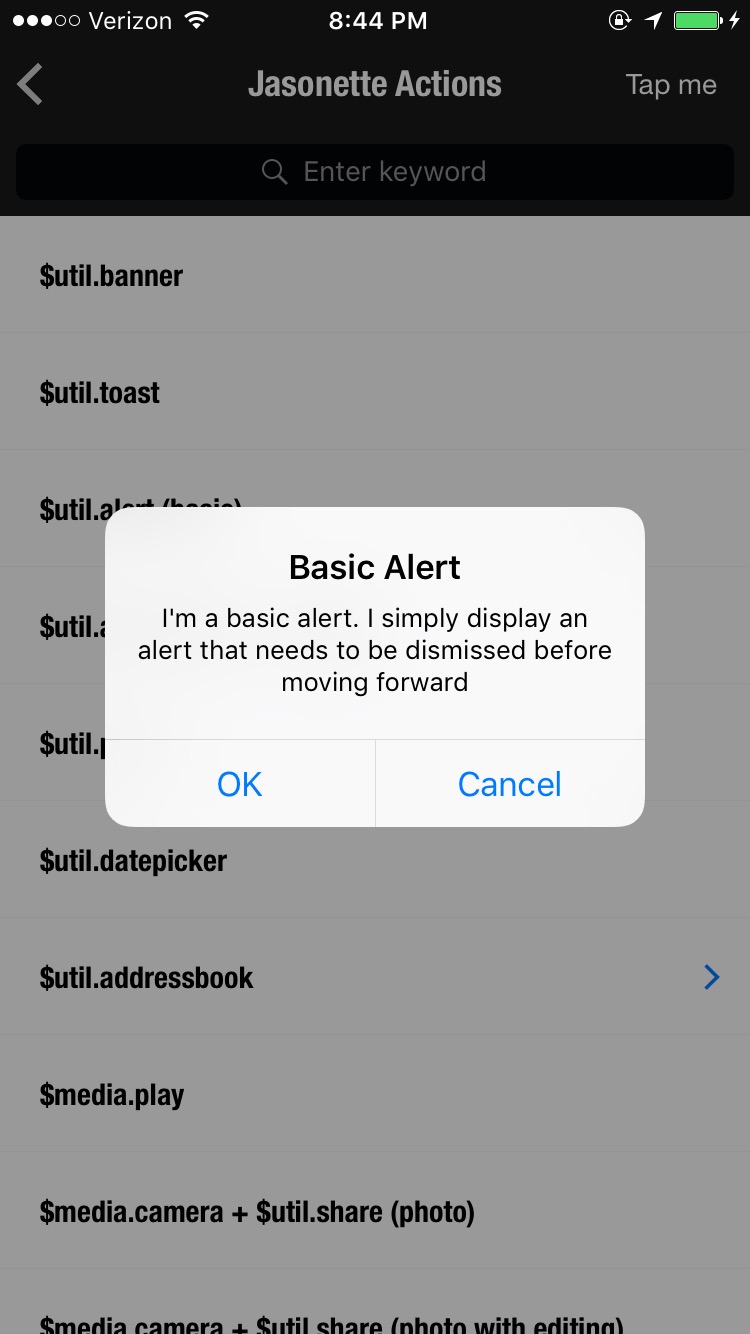 |
 |
■ options
title: title of the alertdescription: description captionform(optional): Array of input elements. Each input can have the following attributes:name: name of the field. Use this name to retrieve the value filled out by the uservalue: set this attribute to preset the value inside the input field.placeholder: placeholder texttype(optional) :secureto hide keystrokes with *
■ return value
- if the
formattribute is used, returns the filled out$jasonobject - if the
formattribute is NOT used, no return value - If
okbutton was clicked, it triggers thesuccesscallback. - If
cancelbutton was clicked, it triggers theerrorcallback.
■ examples
Example 1. Simple notice alert
Just a simple alert with an OK and a Cancel button
{
  "type": "$util.alert",
  "options": {
    "title": "Basic Alert",
    "description": "I'm a basic alert. I simply display an alert that needs to be dismissed before moving forward"
  },
  "success": {
    "type": "$render"
  }
}
Example 2. Form Alert
Here's an example of an alert that lets users fill out a form and return the value.
{
  "type": "$util.alert",
  "options": {
    "title": "Demo alert with input",
    "description": "Try entering values and press OK",
    "form": [{
      "name": "username",
      "placeholder": "Enter username"
    }, {
      "name": "password",
      "placeholder": "Enter password",
      "secure": "true"
    }]
  }
}
In this case, after the user fills out the form and presses "OK", the action will finish with a return value that takes the following form:
{
  "$jason": {
    "username": "ethan",
    "password": "sdn3Uef2!"
  }
}
To use this return value, you can chain another action as a success callback and use the attributes, like this:
{
  "type": "$util.alert",
  "options": {
    "title": "Sign in",
    "description": "Please enter username and password",
    "form": [{
      "name": "username"
    }, {
      "type": "secure",
      "name": "password"
    }]
  },
  "success": {
    "type": "$network.request",
    "options": {
      "url": "https://www.jasonclient.org/users/sign_in.json",
      "method": "post",
      "data": {
        "username": "{{$jason.username}}",
        "password": "{{$jason.password}}"
      }
    }
  }
}
$util.share
Share a text, image, video, or a combination of them.
| Share sheet | SMS example |
|---|---|
|
|
■ options
items(array): Array of items to be shared. Each item can have the following attributestype:"text"|"image"|"video"text: textdata: raw data to be shared (only forimagetype)url: image url (only forimagetype)file_url: video url (only forvideotype)
■ return value
- none
■ examples
Example 1. Sharing a simple text
{
  "type": "$util.share",
  "options": {
    "items": [{
      "type": "text",
      "text": "This is an automated message"
    }]
  }
}
Example 2. Sharing an image captured from $snapshot
{
  "type": "$snapshot",
  "success": {
    "type": "$util.share",
    "options": {
      "items": [{
        "type": "image",
        "data": "{{$jason.data}}"
      }]
    }
  }
}
Example 3. Sharing a video captured from $media.camera
{
  "type": "$media.camera",
  "success": {
    "type": "$util.share",
    "options": {
      "items": [{
        "type": "video",
        "file_url": "{{$jason.file_url}}"
      }]
    }
  }
}
Example 4. Sharing an image from a URL, and a text
{
  "type": "$util.share",
  "options": {
    "items": [{
      "type": "image",
      "url": "https://vjs.zencdn.net/v/oceans.png"
    },{
      "type": "text",
      "text": "This is a picture of ocean"
    }]
  }
}
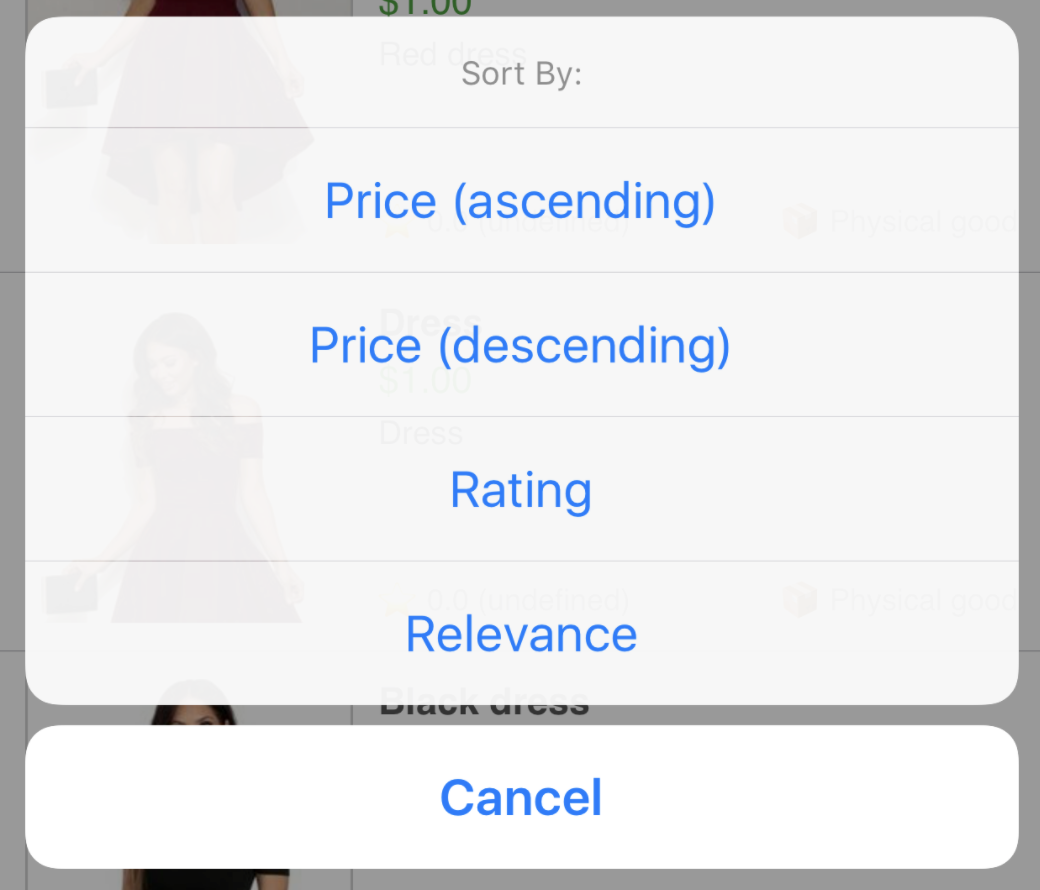
$util.picker
Opens a multiple choice picker menu, with each item linking to an action or an href.
■ options
title(string): The top title caption for the pickeritems(array): An array of items from which the user can choose. Each item can contain the following attributes:
■ Return value
- none
■ example
{
  "$jason": {
    "head": {
      ...
    },
    "body": {
      "header": {
        "menu": {
          "text": "Menu",
          "action": {
            "type": "$util.picker",
            "options": {
              "items": [{
                "text": "Trigger $util.banner",
                "action": {
                  "type": "$util.banner",
                  "options": {
                    "title": "Success",
                    "description": "This is a banner"
                  }
                }
              },{
                "text": "Trigger $util.alert",
                "action": {
                  "type": "$util.alert",
                  "options": {
                    "title": "Alert",
                    "description": "This is an alert triggered by $util.picker"
                  }
                }
              },{
                "text": "Trigger $audio.play",
                "action": {
                  "type": "$audio.play",
                  "options": {
                    "url": "https://s3.amazonaws.com/www.textcast.co/icons/yo.mp3"
                  }
                }
              }]
            }
          }
        }
      ...
}
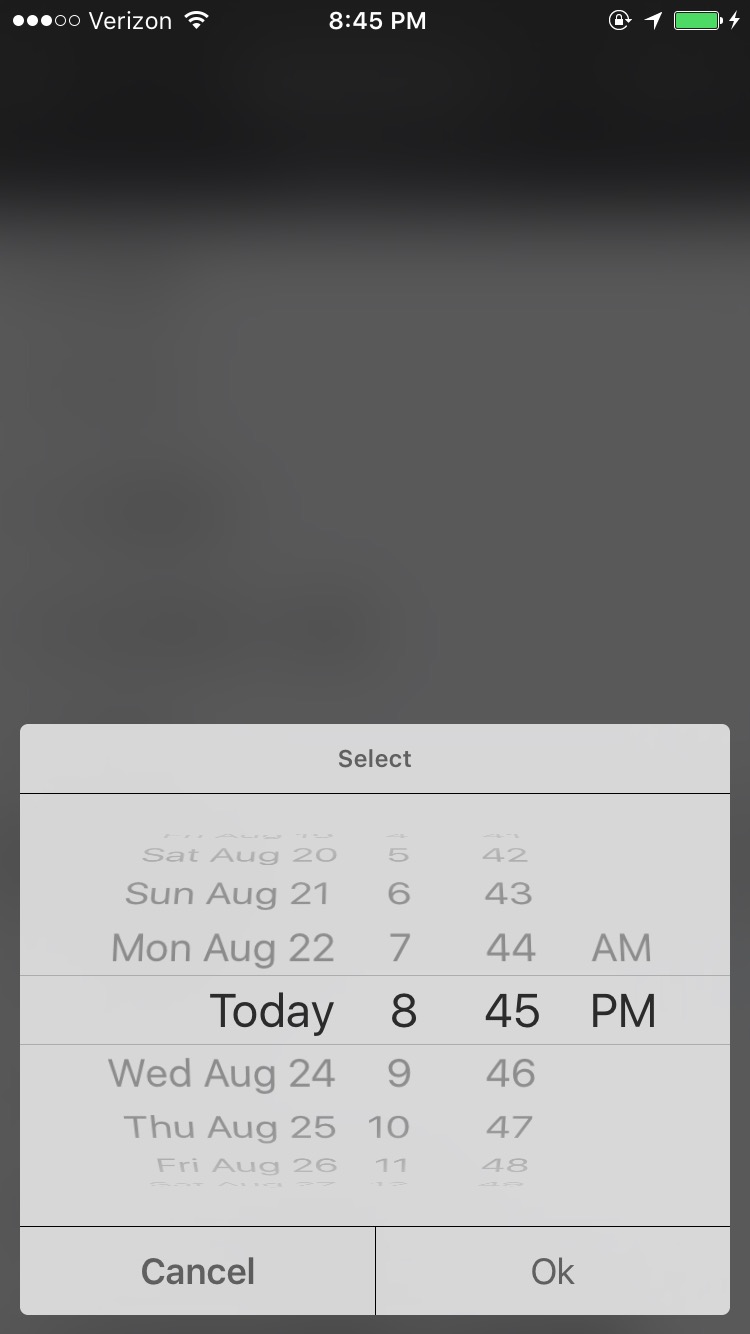
$util.datepicker
Opens a date picker
■ options
- none
■ return value
When a user selects one of the dates it returns the selected date in in unix timestamp format (in string) like this:
{
  "value": "1471310358216"
}
■ example
{
  "$jason": {
    "head": {
    "title": "Datepicker Demo"
    },
    "body": {
      "sections": [{
        "items": [{
          "type": "label",
          "text": "Pick a date",
          "action": {
            "type": "$util.datepicker",
            "options": {
              "title": "Pick a date",
              "description": "Just pick one"
            },
            "success": {
              "type": "$util.alert",
              "options": {
                "title": "Selected date",
                "description": "{{(new Date(parseInt(<span style='color:#ff0000;'>$jason</span>) * 1000)).toString()}}"
              }
            }
          }
        }]
      }]
    }
  }
}
$util.addressbook
Fetches the addressbook to populate them into $jason.
■ options
- none
■ return value
Returns an array of contacts from the addressbook, like this:
[
  {
    "name": "John",
    "phone": "9176568890",
    "email": "john@jasonclient.org"
  },
  {
    "name": "Mary",
    "phone": "9172562890",
    "email": "mary@jasonclient.org"
  },
  {
    "name": "Ethan",
    "phone": "2026468271",
    "email": "ethan@jasonclient.org"
  }
]
■ example
In this example, we access the addressbook when the view $loads, then $render the content using the given template.
{
  "$jason": {
    "head": {
      "title": "Addressbook demo",
      "actions": {
        "$load": {
          "type": "$util.addressbook",
          "success": {
            "type": "$render"
          }
        }
      },
      "templates": {
        "body": {
          "sections": [
            {
              "items": {
                "{{#each $jason}}": {
                  "type": "vertical",
                  "style": {
                    "padding": "5",
                    "spacing": "5"
                  },
                  "components": [
                    {
                      "type": "label",
                      "text": "{{name}}"
                    },
                    {
                      "type": "label",
                      "text": "{{JSON.stringify(phone)}}"
                    },
                    {
                      "type": "label",
                      "text": "{{JSON.stringify(email)}}"
                    }
                  ]
                }
              }
            }
          ]
        }
      }
    }
  }
}
■ Required Permissions
On iOS, $util.addressbook works out of the box so you don't need to do anything.
But on Android you need to set up a android.permission.READ_CONTACTS permission.
Just open up AndroidManifest.xml file from Android Studio, and uncomment the lines described below:

── MEDIA ──
Anything related to photo/video/camera.
$media.camera
Capture a video or a photo using the device camera

■ options
type:"photo"|"video"edit:"true"(Don't include to remove the editing step)quality:"high"|"medium"|"low"(Default is"medium")
■ return value
Returns an object with multiple attributes which represent the video/photo
file_url: local file url (Used for videos)data_uri: data-uri stringdata: raw data (Used for photos)content_type:"image/png"|"image/jpeg"|"video/mp4"
For example, here's an example return value:
{
  "file_url": "...",
  "data_uri": "data:image/png;base64,.....",
  "data": "...",
  "content_type": "image/png"
}
Normally you will want to pass the data to another action such as $network.upload.
■ example
In the following example, we take a photo using $media.camera, and then utilize the data_url from the return value to set the background image url.
{
  "$jason": {
    "head": {
      "title": "Camera",
      "description": "Tap to open up camera",
      "actions": {
        "$load": {
          "type": "$media.camera",
          "options": {
            "edit": "true",
            "type": "photo"
          },
          "success": {
            "type": "$render"
          }
        }
      },
      "templates": {
        "body": {
          "background": "{{$jason.data_url}}"
        }
      }
    }
  }
}
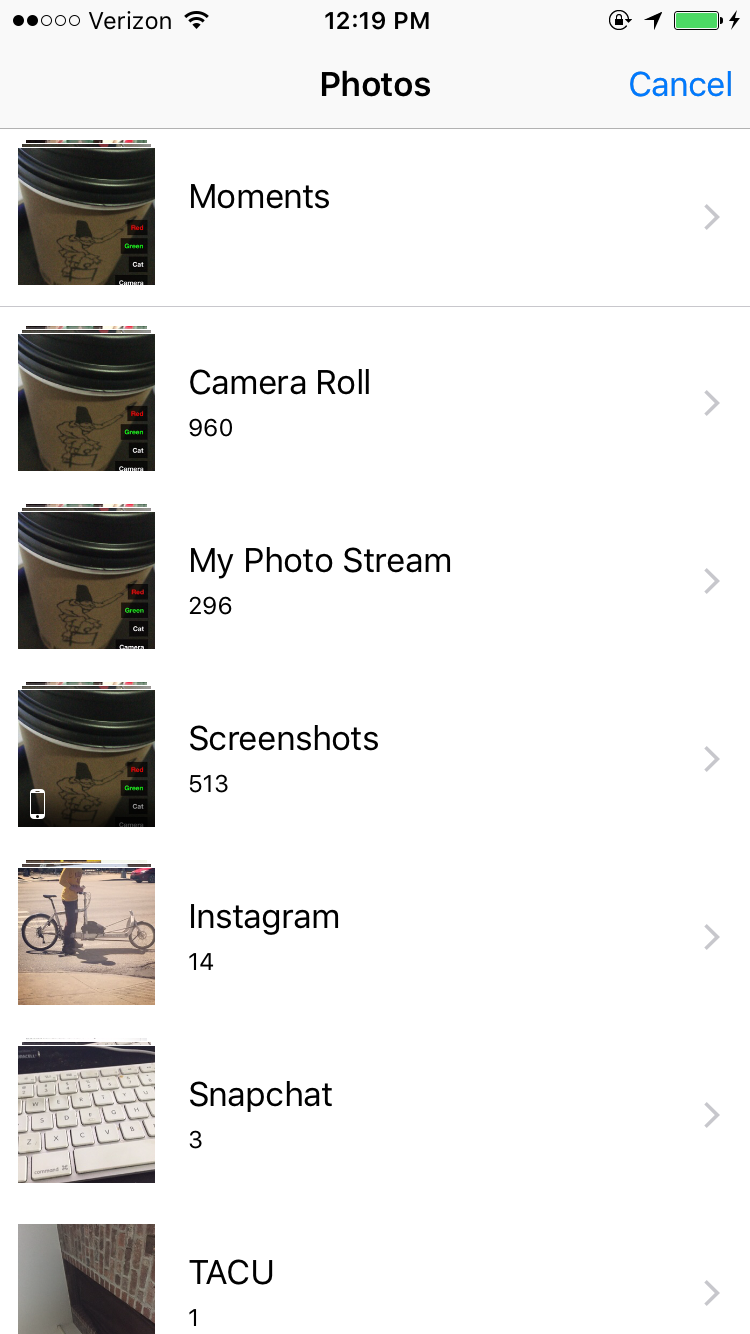
$media.picker
Opens the device camera roll.
■ options
type:"photo"|"video"edit:"true"(Don't include to remove the editing step)quality:"high"|"medium"|"low"(Default is"medium")
■ return value
Same as $media.camera
■ example
{
    "$jason": {
        "head": {
            "title": "Media picker",
            "description": "Tap to select media"
        },
        "body": {
            "sections": [{
                "items": [{
                    "type": "label",
                    "text": "Select media",
                    "action": {
                        "type": "$media.picker",
                        "options": {
                            "edit": "true",
                            "type": "video"
                        },
                        "success": {
                            "type": "$util.alert",
                            "options": {
                                "title": "Selected {{$jason['content_type']}} at",
                                "description": "{{$jason.file_url}}"
                            }
                        }
                    }
                }]
            }]
        }
    }
}
$media.play
plays a video from remote url.
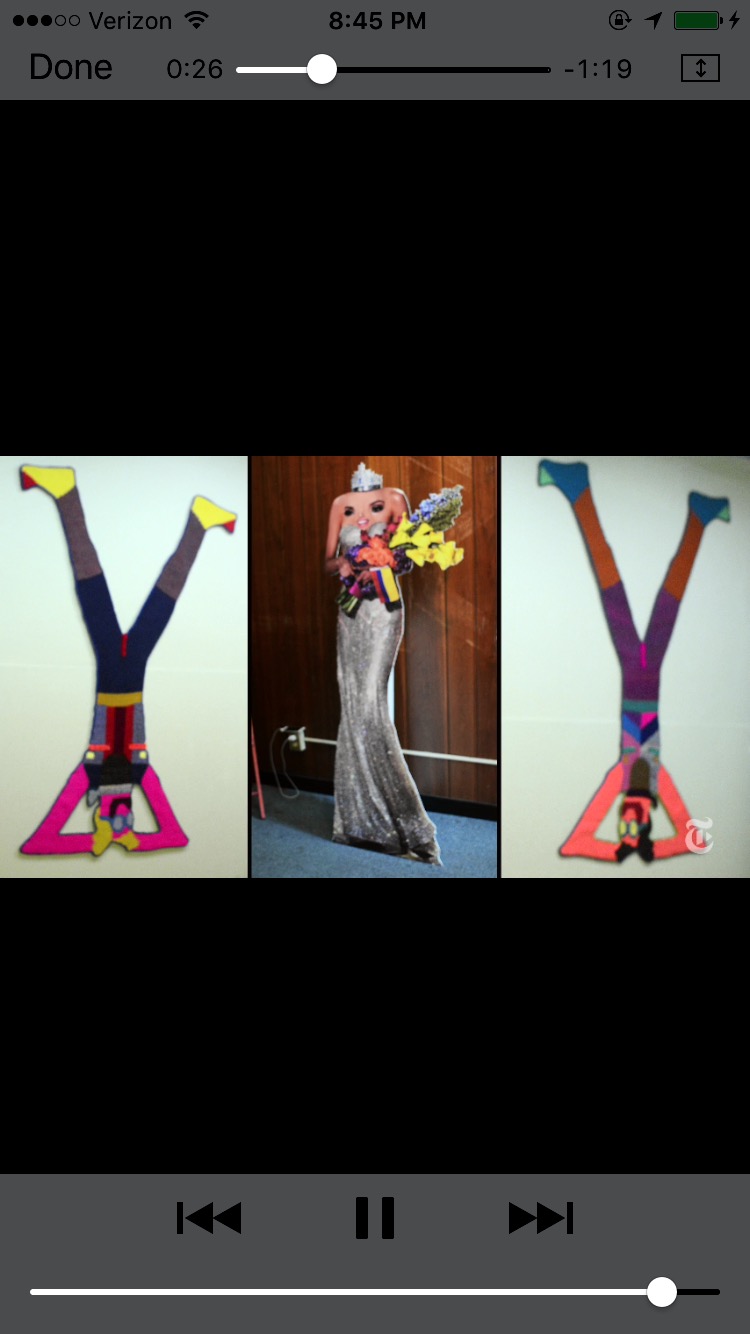
■ options
url: the video url to playmuted:"true"to mute the sound
■ return value
- none
■ example
{
    "$jason": {
        "head": {
            "title": "Video",
            "description": "Tap to play the video"
        },
        "body": {
            "sections": [{
                "items": [{
                    "type": "image",
                    "url": "https://vjs.zencdn.net/v/oceans.png",
                    "action": {
                        "type": "$media.play",
                        "options": {
                            "url": "https://vjs.zencdn.net/v/oceans.mp4"
                        }
                    }
                }]
            }]
        }
    }
}
── Vision ──
Barcode / QR Code detection
- To use
$visionAPI, the body.background must be acameratype, with"device": "back"(front-facing camera can only scan your face, not scan barcodes). $vision.readyevent gets triggered when the camera is ready.- You can trigger $vision.scan to start scanning for barcodes/qrcodes
- The
$vision.scanis asynchronous so it immediately goes on to its success callback after it kicks off the scanning service - The scanning service triggers a $vision.onscan event with the extracted metadata. We can use it to do whatever.
$vision.scan
Starts scanning for barcode. When it scans a code, it will trigger a $vision.onscan event.
■ options
No options required
■ return value
- none. This action is asynchronous and the scanned result will return through the
$vision.onscanevent.
■ example
Quick example:
{
  "$jason": {
    "head": {
      "templates": {
        "body": {
          "background": {
            "type": "camera",
            "options": {
              "device": "back"
            }
          }
        }
      },
      "actions": {
        "$load": {
          "type": "$render"
        },
        "$vision.ready": {
          "type": "$vision.scan"
        },
        "$vision.onscan": {
          "type": "$util.alert",
          "options": {
            "title": "Scanned content",
            "description": "{{$jason.type}} {{$jason.content}}"
           }
        }
      }
    }
  }
}
A couple of important things to notice:
- we have the body's background set as
"type": "camera". This is mandatory to get$visionaction to work. - Then we wait for
$vision.readyevent. And call$vision.scanwhen the event fires. - The
$vision.onscanevent returns with a payload that looks like:
[iOS]

{
  "$jason": {
    "type": "org.iso.QRCode",
    "content": "Hello World"
  }
}
[Android]

{
  "$jason": {
    "type": 256,
    "content": "Hello World"
  }
}
- The
"content"attribute is the content of the barcode - The
"type"represents the barcode type.
More examples
Here are two examples using this API:
- Inline Detection and Rendering: https://jasonbase.com/things/PMj7 (any content can be encoded)
- detect link and $href: https://jasonbase.com/things/rZ0b (Be sure to scan a qrcode that encodes a link)
── AUDIO ──
Anything related to audio
$audio.play
- Play audio from remote url.
- Toggles between play and pause state if called multiple times.
■ options
url: A remote url to stream audio from.title: Title to display on the lock screen while playing in background mode.author: Author name to display on the lock screen while playing in background mode.album: Album name to display on the lock screen while playing in background mode.image: Image url to display on the lock screen while playing in background mode.
■ return value
- none
■ example
{
  "$jason": {
    "head": {
      "title": "Play audio"
    },
    "body": {
      "sections": [{
        "items": [{
          "type": "label",
          "text": "Yo",
          "action": {
            "type": "$audio.play",
            "options": {
              "title": "Busdriver - Worlds to Run",
              "author": "Song Exploder",
              "image": "http://discover.pocketcasts.com/discover/images/400/fff9ba50-53e1-0131-8293-723c91aeae46.jpg",
              "url": "http://www.podtrac.com/pts/redirect.mp3/traffic.libsyn.com/songexploder/SongExploder73-Busdriver.mp3"
            }
          }
        }]
      }]
    }
  }
}
$audio.pause
Pauses an audio clip that's already playing from a remote url.
■ options
- url: if specified, pauses ONLY this url. Otherwise, pauses all audios currently playing.
■ return value
- none
$audio.stop
Stops an audio clip that's already playing from a remote url.
■ options
- url: if specified, stops ONLY this url. Otherwise, stops all audios currently playing.
■ return value
- none
$audio.seek
- Seeks audio already playing from a remote url.
- The position value must be a value between
0and1(in string)
■ options
url: The audio url.position: value between 0 and 1 (Must be in string format)
■ return value
- none
■ example
Here's an example of seeking an audio clip to 30% position
{
    "$jason": {
        "head": {
            "title": "Seek example"
            "actions": {
                "$load": {
                    "type": "$audio.play",
                    "options": {
                        "url": "http://www.podtrac.com/pts/redirect.mp3/traffic.libsyn.com/songexploder/SongExploder73-Busdriver.mp3"
                    }
                }
            }
        },
        "body": {
            "layers": [{
                "type": "label",
                "text": "Go to 30% position",
                "style": {
                    "bottom": "50",
                    "left": "50%-50",
                    "width": "100"
                },
                "action": {
                    "type": "$audio.seek",
                    "options": {
                        "url": "http://www.podtrac.com/pts/redirect.mp3/traffic.libsyn.com/songexploder/SongExploder73-Busdriver.mp3",
                        "position": "0.3"
                    }
                }
            }]
        }
    }
}
$audio.position
Get the position of the specified audio clip
■ options
url: The audio url
■ return value
Returns the position between 0 and 1 in the following format:
{
  "value": "0.3"
}
■ example
The following example displays a toast with the current position when the user taps the label.
{
  "$jason": {
    ...
    "body": {
      "sections": [{
        "items": [{
          "type": "label",
          "text": "How much did I listen so far?",
          "action": {
            "type": "$audio.position",
            "options": {
            "url": "http://www.podtrac.com/pts/redirect.mp3/traffic.libsyn.com/songexploder/SongExploder73-Busdriver.mp3"
          },
          "success": {
            "type": "$util.toast",
            "options": {
              "text": "{{JSON.stringify($jason)}}"
            }
          }
        }]
      }]
    }
  }
}
$audio.duration
Returns total duration of the specified audio clip
■ options
url: The audio url
■ return value
Duration in seconds, in the following format:
{
  "value": "300"
}
■ example
The following example displays a toast with the total duration of the track when the user taps the label.
{
  "$jason": {
    ...
    "body": {
      "sections": [{
        "items": [{
          "type": "label",
          "text": "How long is this track?",
          "action": {
            "type": "$audio.duration",
            "options": {
              "url": "http://www.podtrac.com/pts/redirect.mp3/traffic.libsyn.com/songexploder/SongExploder73-Busdriver.mp3"
            },
            "success": {
              "type": "$util.toast",
              "options": {
                "text": "{{JSON.stringify($jason)}}"
            }
          }
        }]
      }]
    }
  }
}
$audio.record
Record audio
■ options
color: tint color when activecolor:disabled: tint color when pausedtheme:lightto use light theme. Otherwise omit.
■ return value
file_url: the local url in which the audio was storeddata_uri: base64 encoded data-uricontent_type:"audio/m4a"(it's always this format)
Normally you will want to pass the result immediately to a $network.upload call in order to upload it to a cloud storage.
■ example
{
  "$jason": {
    "head": {
      "title": "Play audio"
    },
    "body": {
      "sections": [{
        "items": [{
          "type": "label",
          "text": "Record Now",
          "action": {
            "type": "$audio.record",
            "success": {
              "type": "$util.alert",
              "options": {
                "title": "Audio stored at",
                "description": "{{$jason.url}}"
              }
            }
          }
        }]
      }]
    }
  }
}
Additional Permissions
⚠️ There are certain device permissions you need to turn on in order to use some of these actions.
iOS Permission
To support background audio play, you need to turn on background audio mode. Here's how:
[1] From XCode open info.plist file. Right click on the file and open as source code.
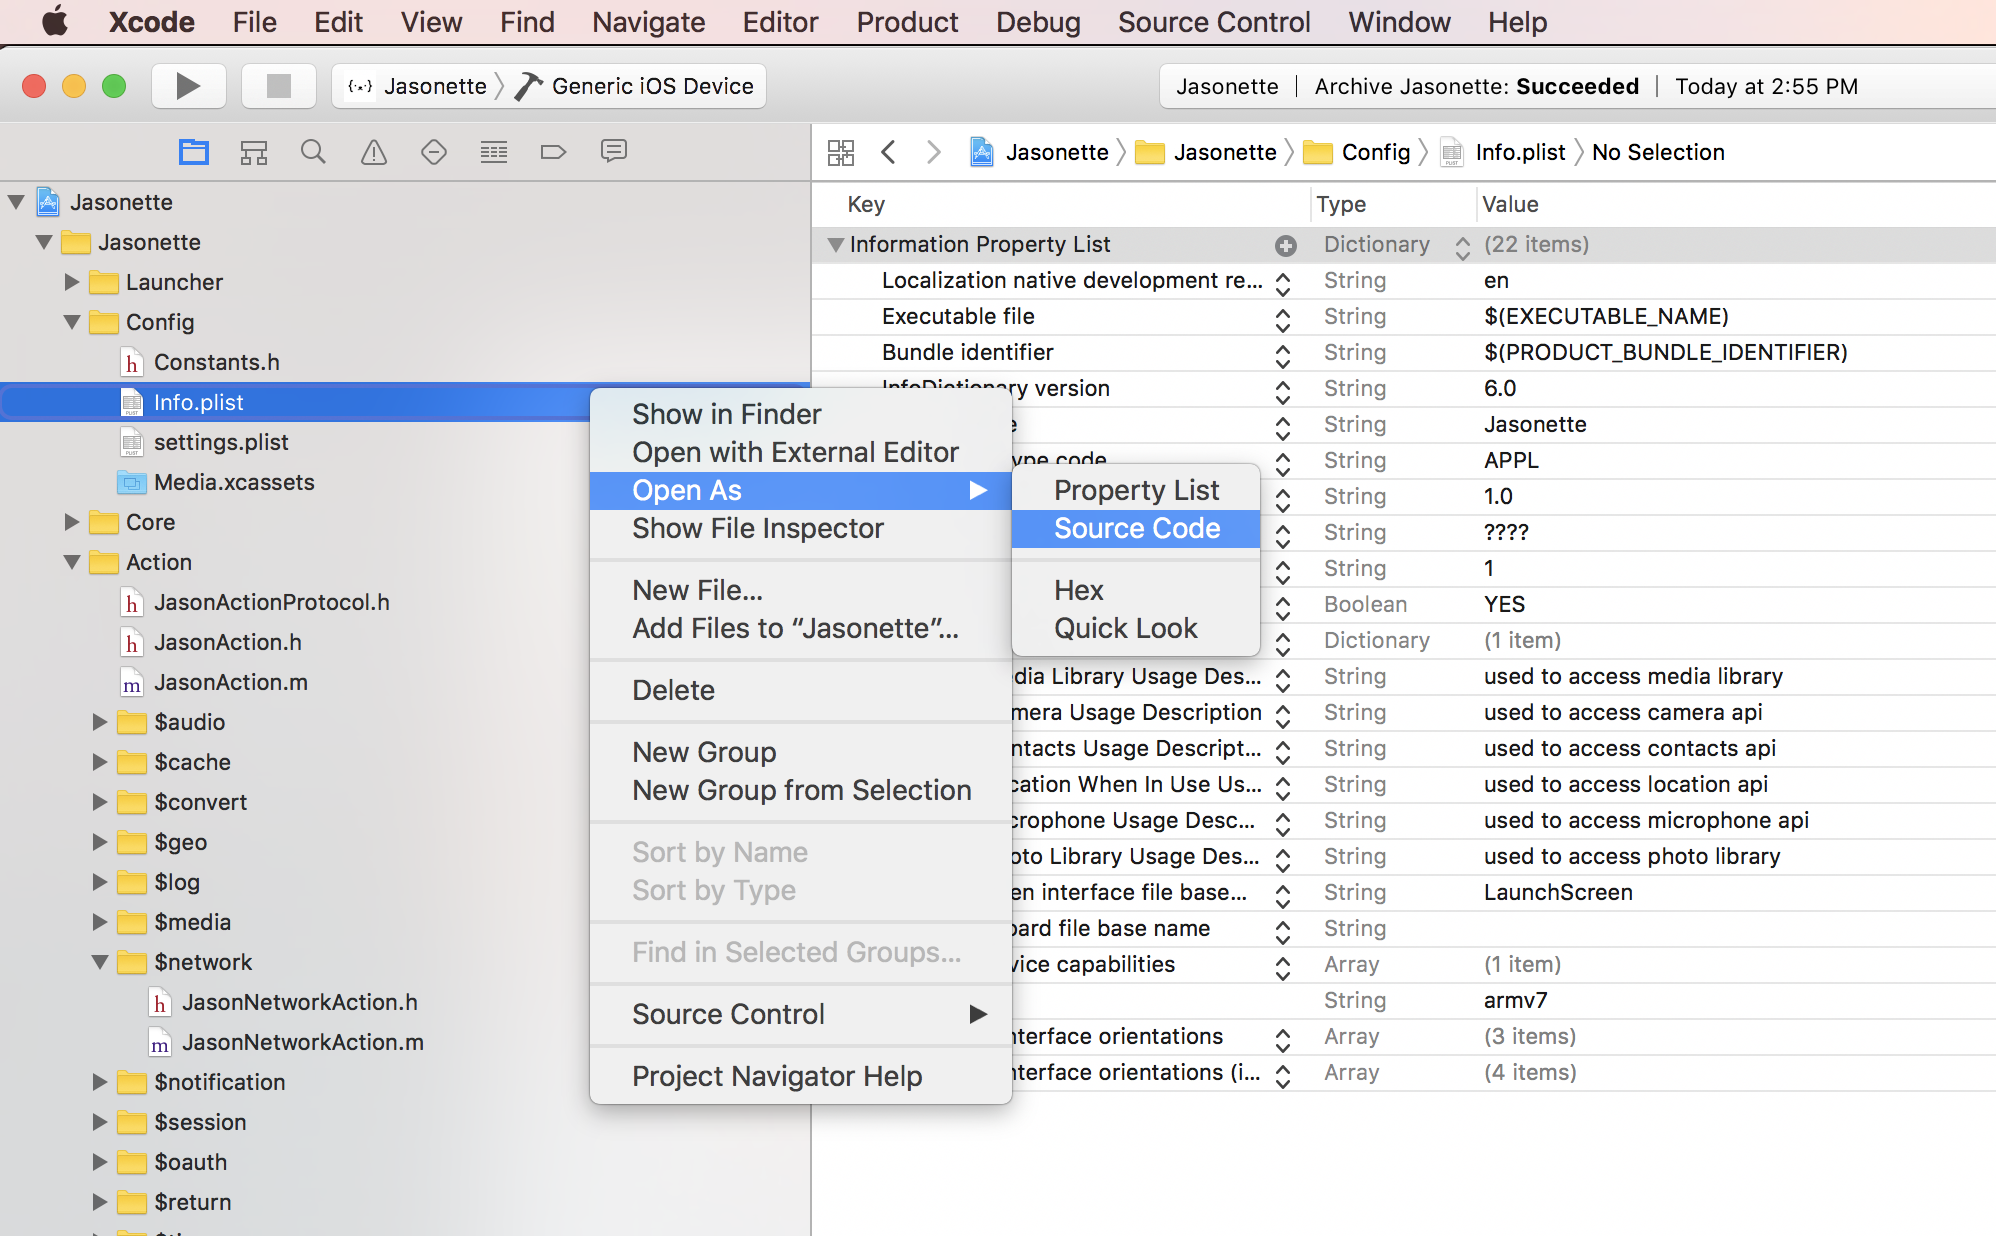
[2] Uncomment the UIBackgroundModes part
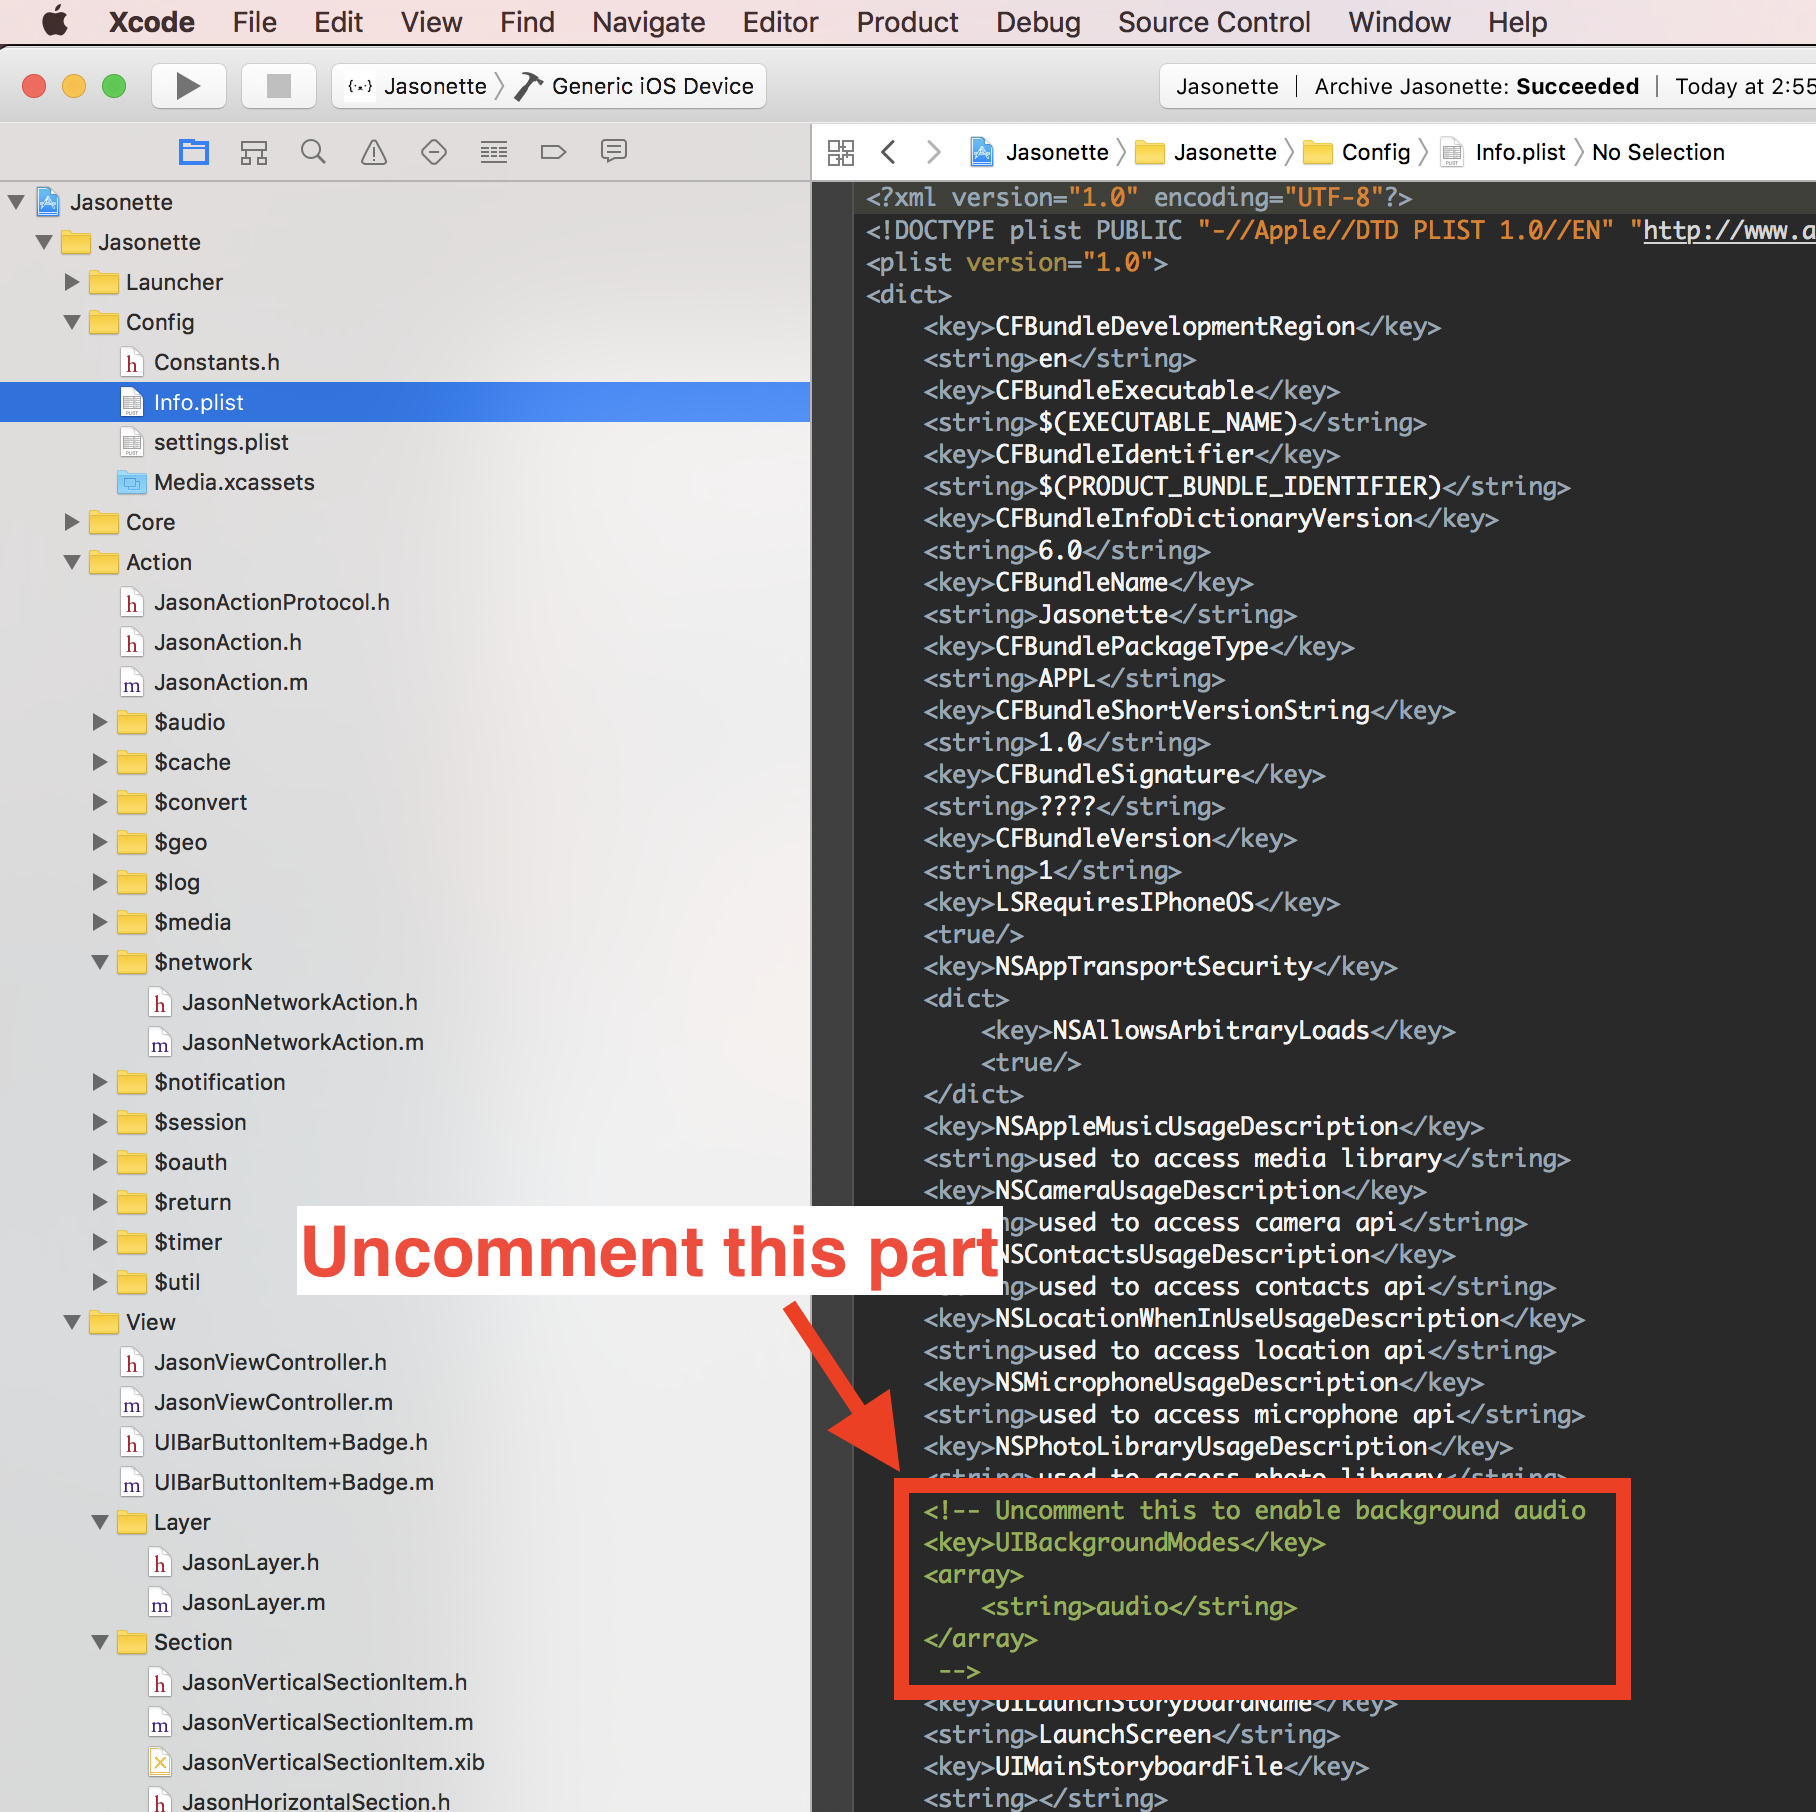
Android Permissions
[A] To support $audio.record on Android, you need to turn on android.permission.RECORD_AUDIO permission.
[B] To support background audio play, you need to turn on android.permission.WAKE_LOCK permission.
First open AndroidManifest.xml file from Android Stuido, and uncomment the relevant lines as shown below:
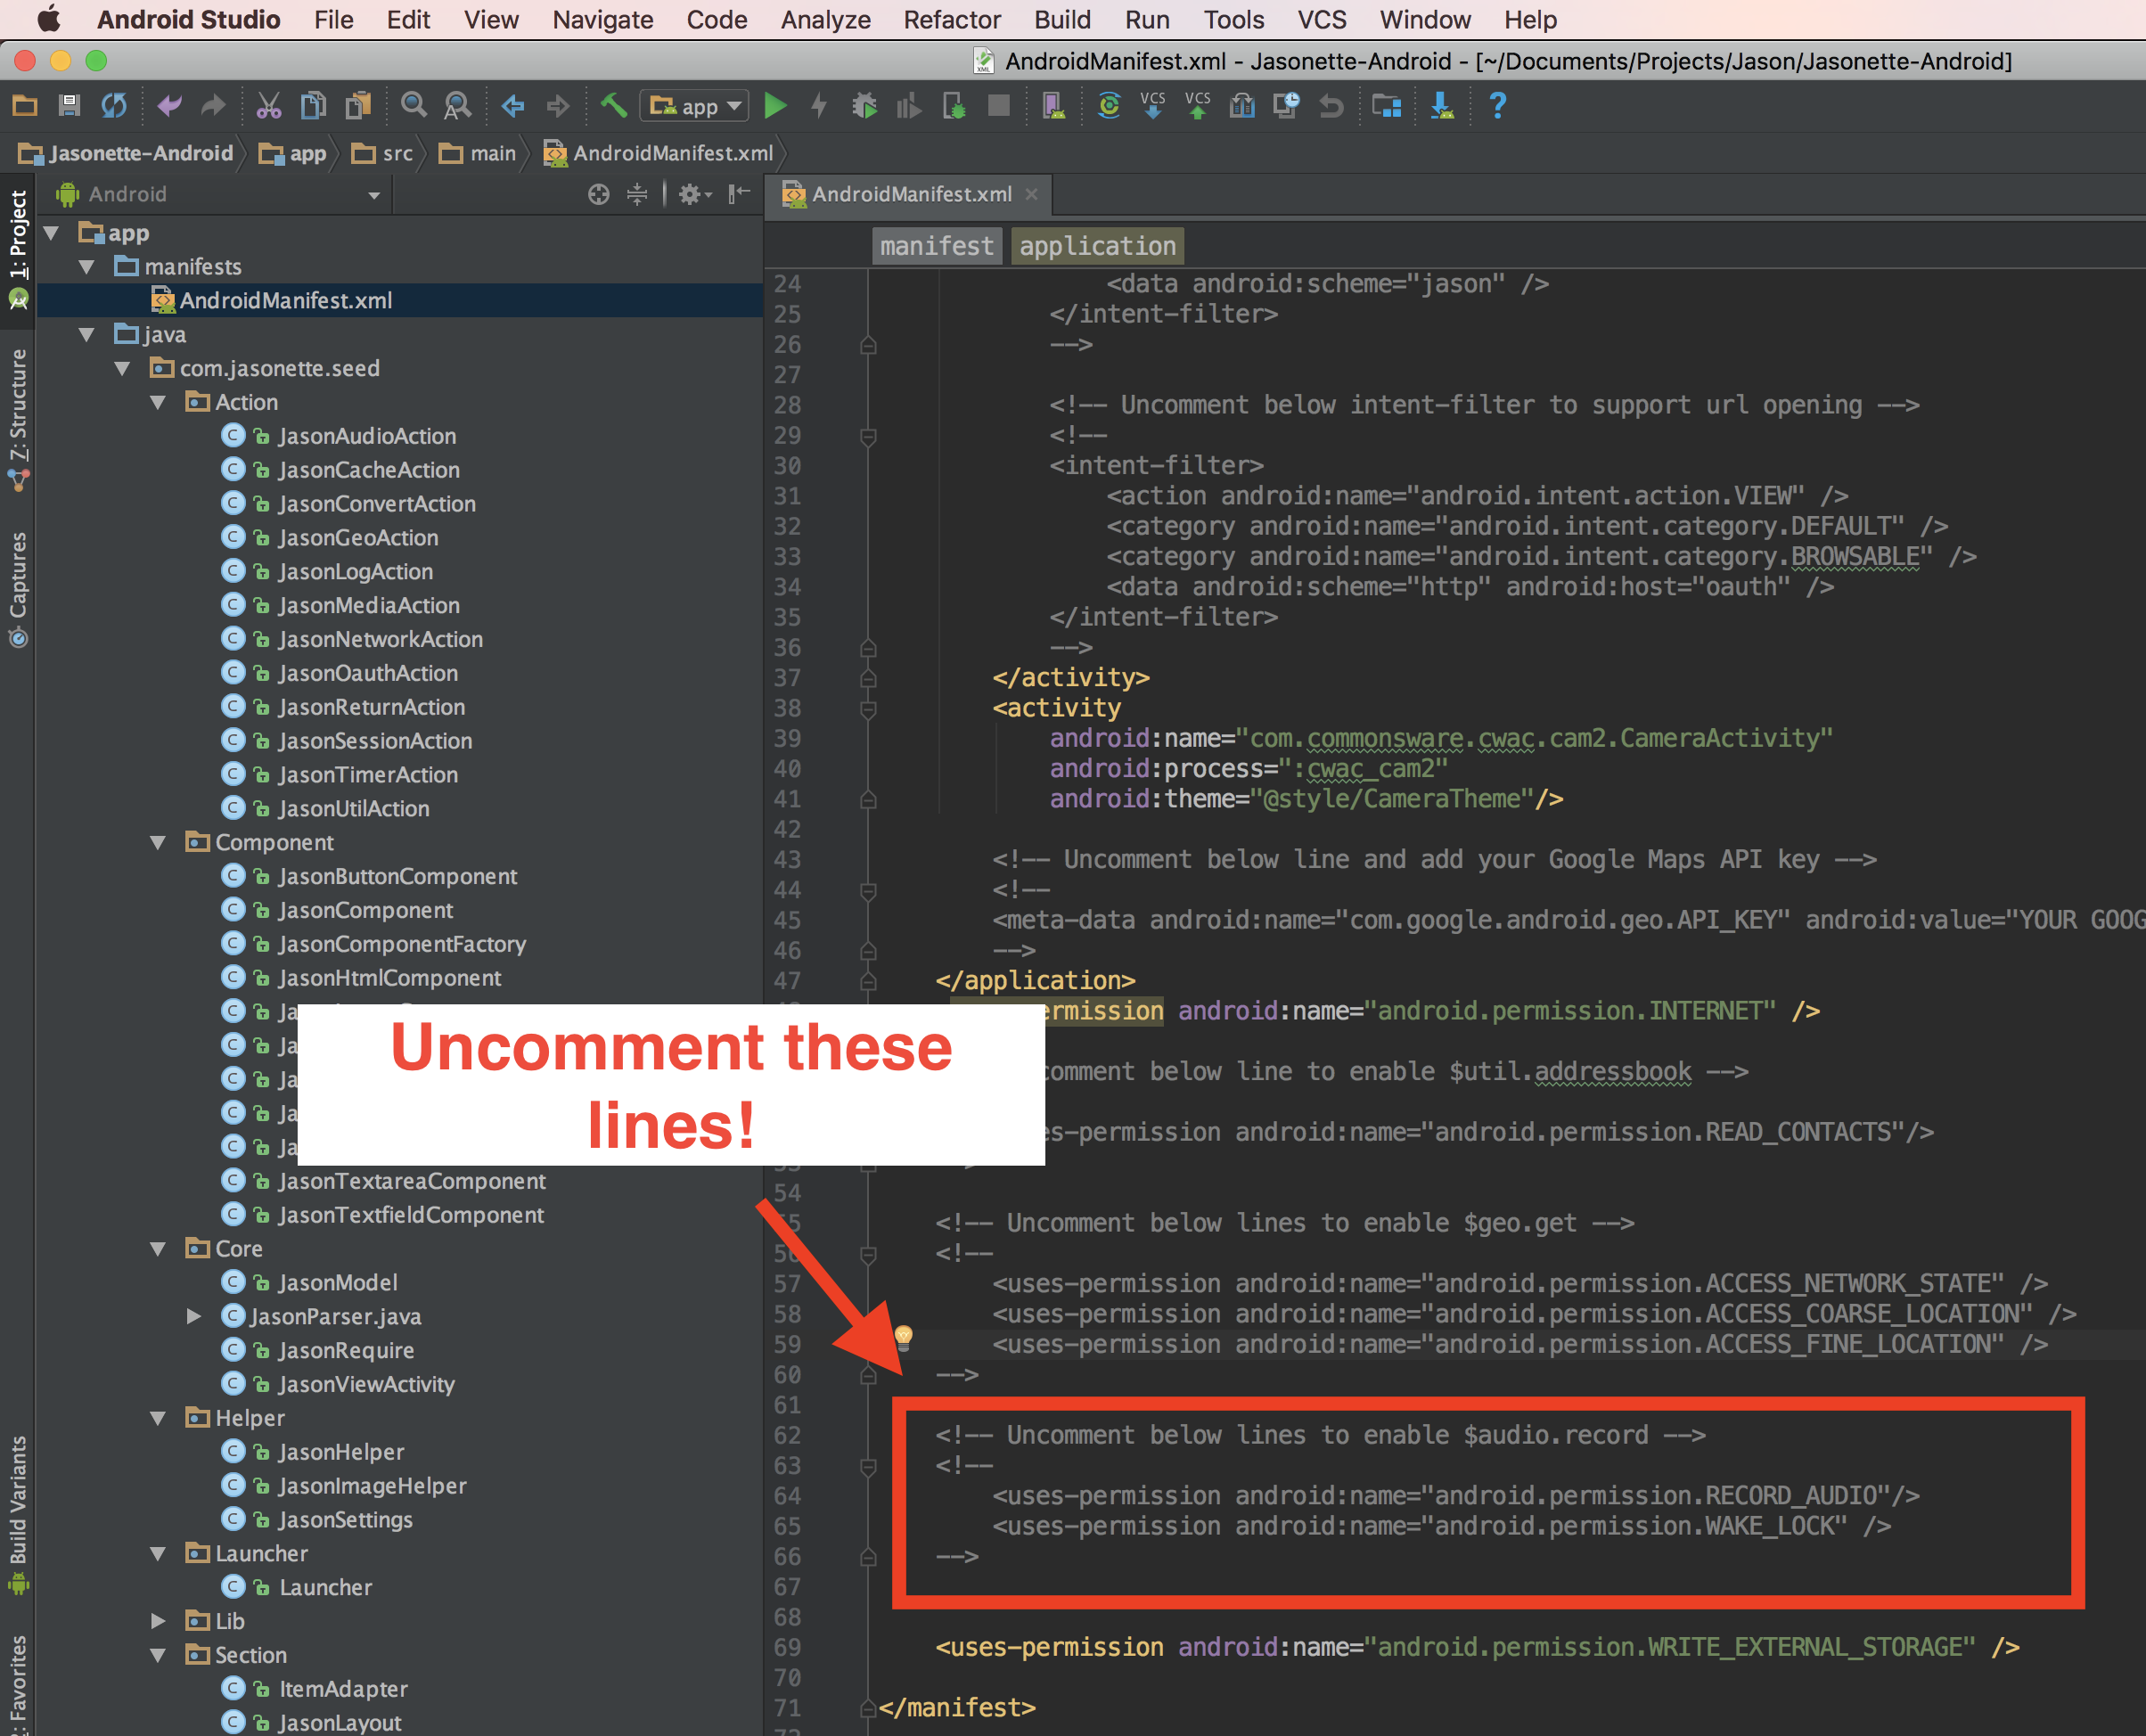
── GEO ──
$geo.get
Get user's geolocation
■ options
distance: accuracy distance in meters. By default it's 5000meters. The lower you go the more accurate it will be, but the longer it will take to retrieve the location.
■ return value
a coord object that contains (latitude),(longitude) format string
{
  "coord": "12.342,22.343"
}
■ example
Below example demonstrates various ways of utilizing $geo.get return values
{
  "$jason": {
    "head": {
      "title": "Right Here",
      "description": "Searching anything nearby, links to yelp, google streetview and foursquare"
    },
    "body": {
      "sections": [
        {
          "items": [
            {
              "type": "label",
              "text": "Street View",
              "style": {
                "size": "40",
                "font": "HelveticaNeue-CondensedBold",
                "color": "#000000"
              },
              "action": {
                "type": "$geo.get",
                "options": {
                  "distance": "1000"
                },
                "success": {
                  "type": "$href",
                  "options": {
                    "url": "http://maps.google.com/maps?q=&layer=c&cbll={{$jason.coord}}&cbp=11,0,0,0,0",
                    "view": "App"
                  }
                }
              }
            },
            {
              "type": "label",
              "text": "Yelp",
              "style": {
                "size": "40",
                "font": "HelveticaNeue-CondensedBold",
                "color": "#000000"
              },
              "action": {
                "type": "$geo.get",
                "success": {
                  "type": "$href",
                  "options": {
                    "url": "http://www.yelp.com/search?find_desc=food&cll={{$jason.coord}}&ns=1",
                    "view": "App"
                  }
                }
              }
            },
            {
              "type": "label",
              "text": "Foursquare",
              "style": {
                "size": "40",
                "font": "HelveticaNeue-CondensedBold",
                "color": "#000000"
              },
              "action": {
                "type": "$geo.get",
                "success": {
                  "type": "$href",
                  "options": {
                    "url": "https://foursquare.com/explore?ll={{$jason.coord}}&mode=url&q=Food",
                    "view": "App"
                  }
                }
              }
            }
          ]
        }
      ]
    }
  }
}
■ Required Permissions
On iOS, $geo.get works out of the box so you don't need to do anything.
But on Android you need to set up a location permission.
Just open up AndroidManifest.xml file from Android Studio, and uncomment the lines described below:
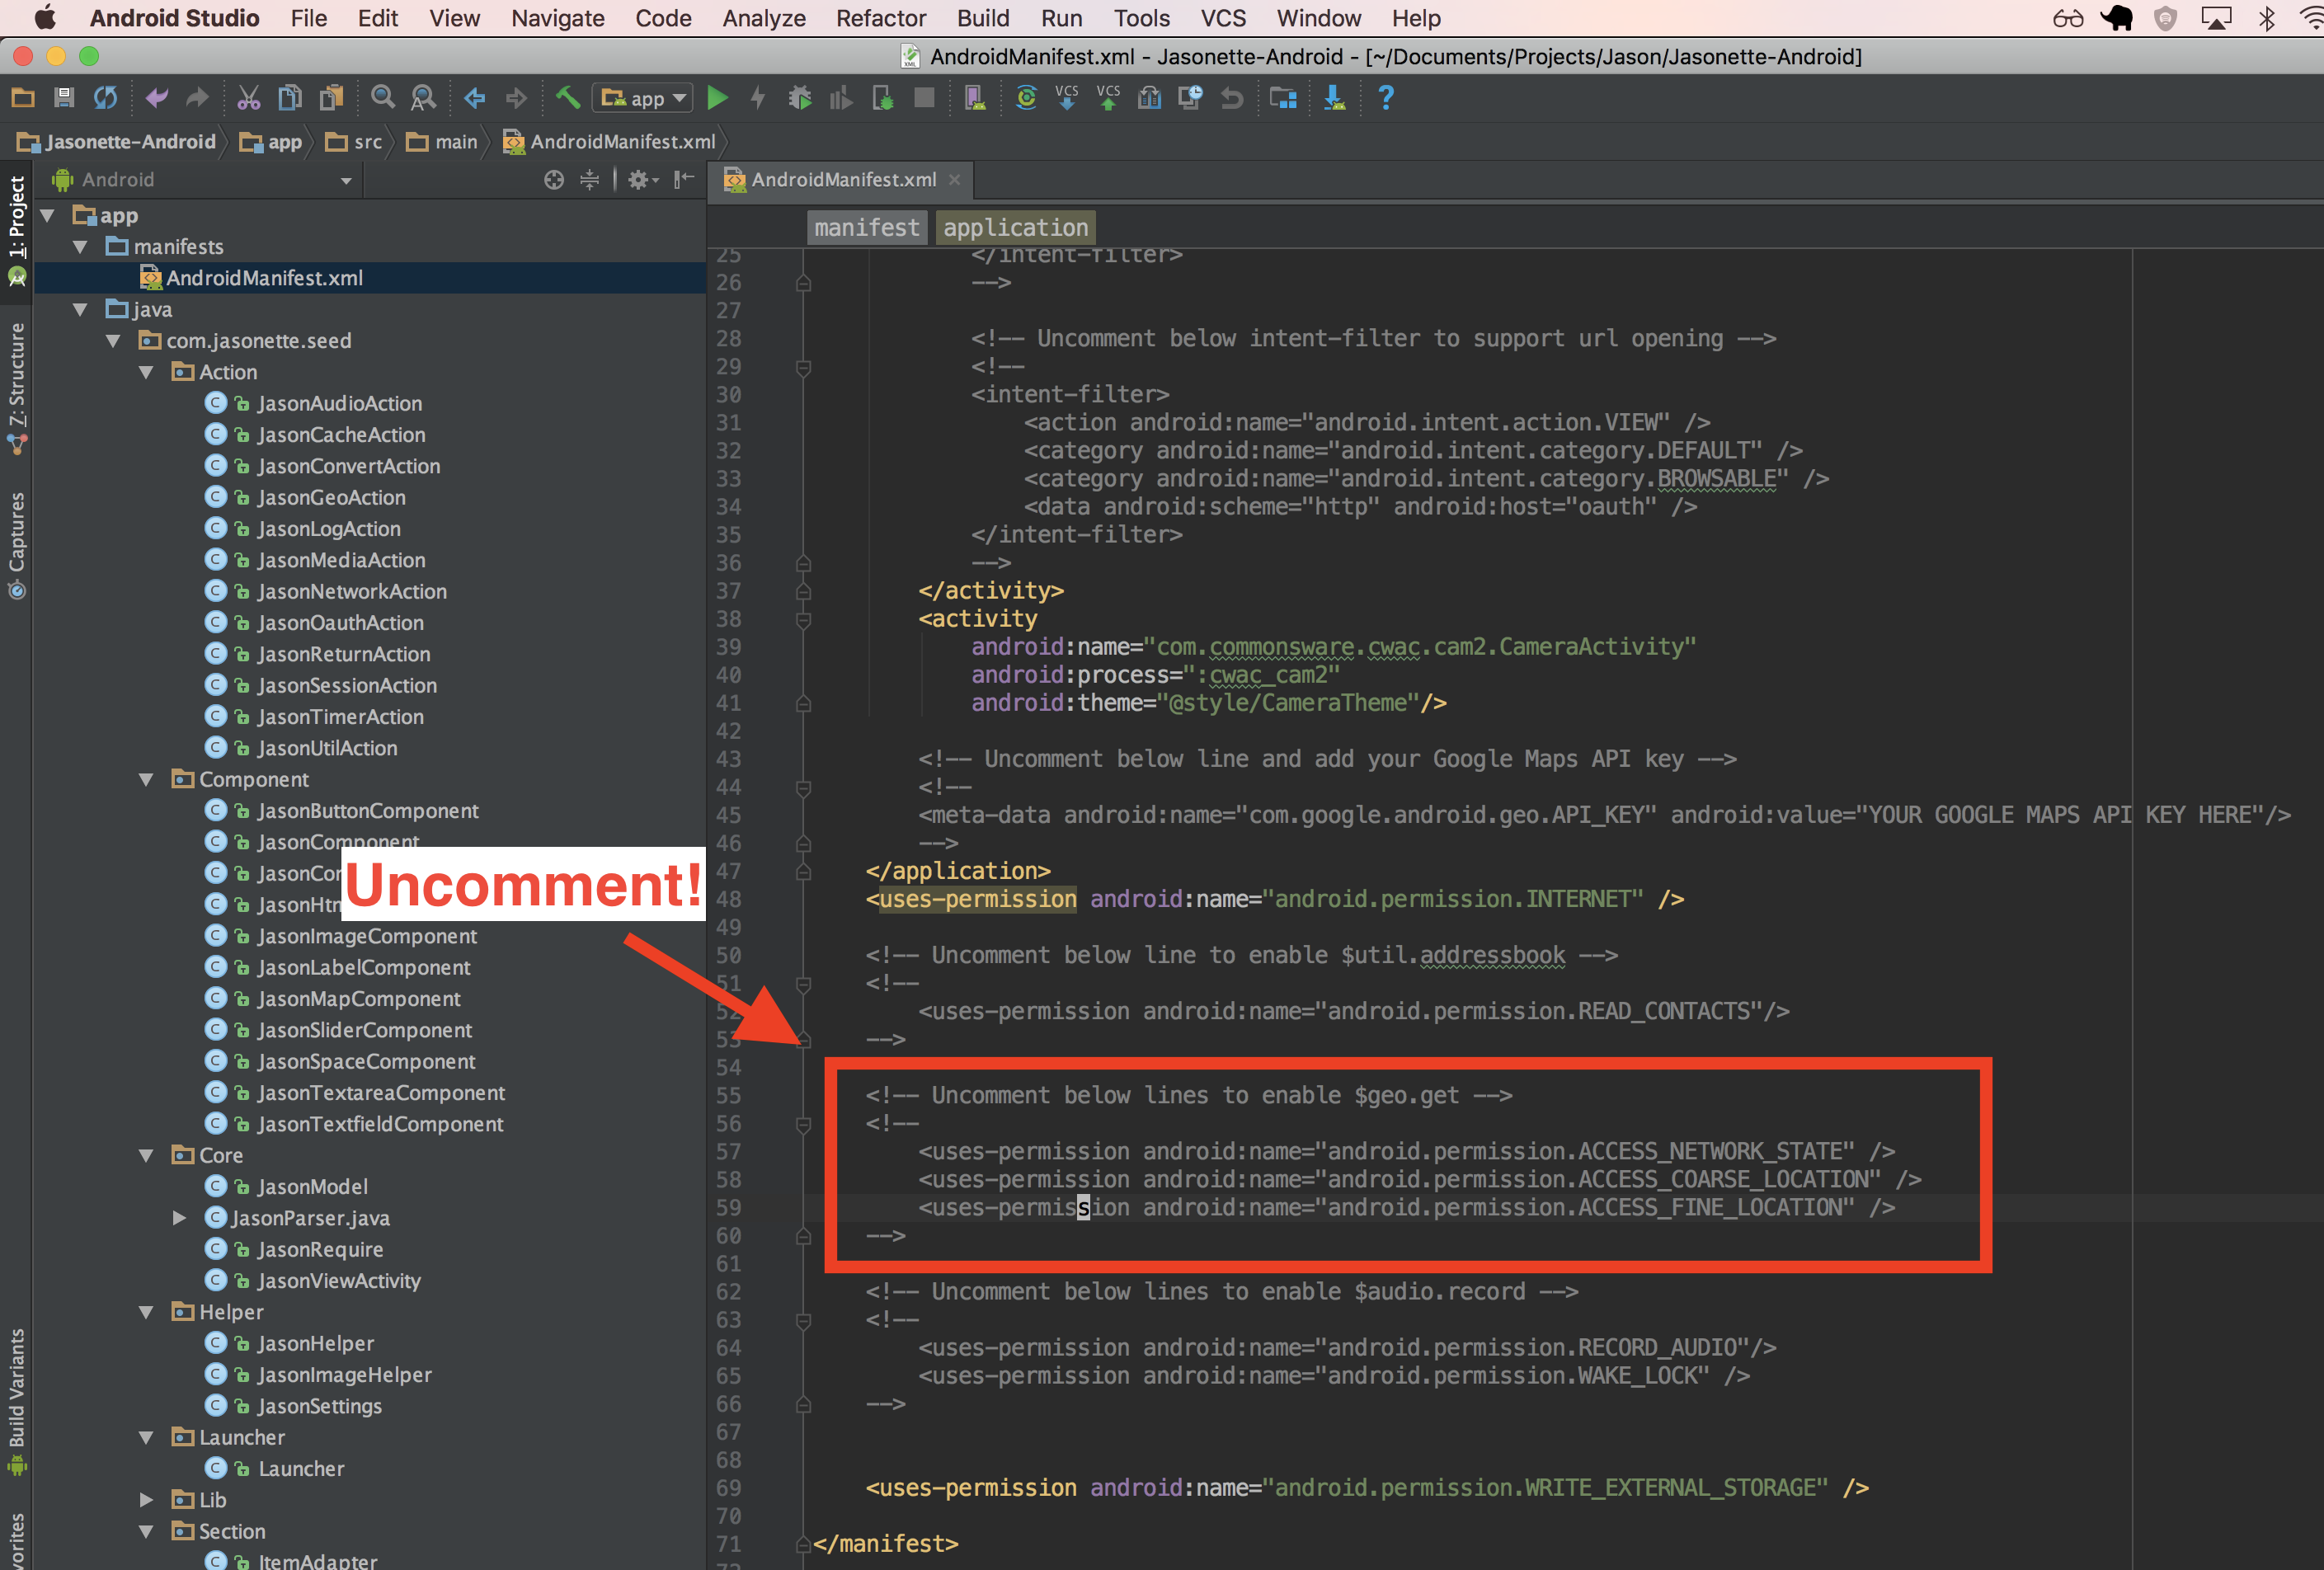
── TIMER ──
$timer.start
Start a timer
■ options
interval: timer interval in secondsname: name of the timer (used later to stop it)repeats: if set to"true", it's a perpetually repeating timer. Otherwise the timer gets called only once.action: the action to execute on every timer interval.
■ return value
- none
■ example
{
  "$jason": {
    "head": {
      "actions": {
        "$load": {
          "type": "$timer.start",
          "options": {
            "interval": "1",
            "name": "timer1",
            "repeats": "true",
            "action": {
              "type": "$render"
            }
          }
        }
      },
      "templates": {
        ...
      }
    }
  }
}
$timer.stop
Stops a timer
■ options
name: the name of the timer to stop. You need to have started a timer with a name first. It will stop all running timers if the name is not specified.
■ return value
- none
■ example
{
  "$jason": {
    ...
    "body": {
      "sections": [{
        "items": [{
          "type": "label",
          "text": "Stop the timer",
          "action": {
            "type": "$timer.stop",
            "options": {
              "name": "timer1"
            }
          }
        }]
      }]
    }
  }
}
── CONVERSION ──
Convert other data formats into JSON format
$convert.csv
Convert CSV to JSON
■ options
data: CSV string
■ return value
- returns the parsed JSON result.
- Expected format: must have the first row populated with attribute names. (See below for an example)
■ example
Here's an example CSV string returned from a network request.
name, descrption, url, icon
github, social coding, https://www.github.com, https://assets-cdn.github.com/images/modules/logos_page/GitHub-Mark.png
facebook, Best place to build & make an impact., https://www.facebook.com, https://www.facebook.com/images/fb_icon_325x325.png
product hunt, Discover your next favorite thing, https://www.producthunt.com, https://pbs.twimg.com/profile_images/699572900643213312/RC2oRewL.jpg
Notice how the first line is entirely made up of attribute names, and the rest rows are the actual data.
We will try to parse this CSV into JSON by using the following code:
{
  "$jason": {
    "head": {
      "actions": {
        "$load": {
          "type": "$network.request",
          "options": {
            "url": "http://hastebin.com/raw/xiceheroku",
            "data_type": "raw"
          },
          "success": {
            "type": "$convert.csv",
            "options": {
              "data": "{{$jason}}"
            },
            "success": {
              "type": "$render"
            }
          }
        }
      }
    }
  }
}
The end result:
[
  {
    "name": "github",
    "description": "social coding",
    "url": "https://www.github.com",
    "icon": "https://assets-cdn.github.com/images/modules/logos_page/GitHub-Mark.png"
  },
  {
    "name": "facebook",
    "description": "Best place to build & make an impact.",
    "url": "https://www.facebook.com",
    "icon": "https://www.facebook.com/images/fb_icon_325x325.png"
  },
  {
    "name": "product hunt",
    "description": "Discover your next favorite thing",
    "url": "https://www.producthunt.com",
    "icon": "https://pbs.twimg.com/profile_images/699572900643213312/RC2oRewL.jpg"
  }
]
$convert.rss
Convert RSS to JSON. Built on top of node-feedparser library
■ options
data: RSS string
■ return value
returns the parsed JSON result in the following format (You can learn more about the spec here):
■ example
Here's an example where it makes a network request to http://feeds.gawker.com/lifehacker/full with data_type of rss, converts it to JSON using $convert.rss, and then renders it.
{
  "actions": {
    "$load": {
      "type": "$network.request",
      "options": {
        "url": "http://feeds.gawker.com/lifehacker/full",
        "data_type": "rss"
      },
      "success": {
        "type": "$convert.rss",
        "options": {
          "data": "{{$jason}}"
        },
        "success": {
          "type": "$render"
        }
      }
    }
  }
}
The converted result right before $render will look something like this:
{
  "$jason": [
    {
      "author": "Alan Henry",
      "rss:pubdate": {
        "@": {},
        "#": "Thu, 9 Jun 2016 00:00:00 GMT"
      },
      "source": {},
      "guid": "1780470292",
      "link": "http://feeds.gawker.com/~r/lifehacker/full/~3/kcJMaJ6Ad7I/the-edge-of-the-world-desktop-1780470292",
      "title": "The Edge of the World Desktop",
      "summary": "<p class=\"first-text\">This OS X desktop is simple, elegant, and combines a few simple widgets with a gorgeous wallpaper to great effect. If you like what you see, here’s how you can set it up, customize your own menubar, and give your Mac the same look. </p>",
      "image": {},
      "rss:category": [
        {
          "@": {
            "domain": ""
          },
          "#": "featured desktop"
        },
        {
          "@": {
            "domain": ""
          },
          "#": "desktops"
        },
        {
          "@": {
            "domain": ""
          },
          "#": "wallpapers"
        },
        {
          "@": {
            "domain": ""
          },
          "#": "customization"
        },
        {
          "@": {
            "domain": ""
          },
          "#": "personalization"
        },
        {
          "@": {
            "domain": ""
          },
          "#": "hud"
        },
        {
          "@": {
            "domain": ""
          },
          "#": "rainmeter"
        },
        {
          "@": {
            "domain": ""
          },
          "#": "themes"
        },
        {
          "@": {
            "domain": ""
          },
          "#": "skins"
        },
        {
          "@": {
            "domain": ""
          },
          "#": "windows"
        },
        {
          "@": {
            "domain": ""
          },
          "#": "os x"
        },
        {
          "@": {
            "domain": ""
          },
          "#": "mac"
        },
        {
          "@": {
            "domain": ""
          },
          "#": "linux"
        }
      ],
      "rss:link": {
        "@": {},
        "#": "http://feeds.gawker.com/~r/lifehacker/full/~3/kcJMaJ6Ad7I/the-edge-of-the-world-desktop-1780470292"
      },
      "feedburner:origlink": {
        "@": {},
        "#": "http://lifehacker.com/the-edge-of-the-world-desktop-1780470292"
      },
      "enclosures": [],
      "origlink": "http://lifehacker.com/the-edge-of-the-world-desktop-1780470292",
      "pubDate": "2016-06-09T00:00:00.000Z",
      "pubdate": "2016-06-09T00:00:00.000Z",
      "rss:guid": {
        "@": {
          "ispermalink": "false"
        },
        "#": "1780470292"
      },
      "date": "2016-06-09T00:00:00.000Z",
      "rss:title": {
        "@": {},
        "#": "The Edge of the World Desktop"
      },
      "meta": {
        "#ns": [
          {
            "xmlns:itunes": "http://www.itunes.com/dtds/podcast-1.0.dtd"
          },
          {
            "xmlns:dc": "http://purl.org/dc/elements/1.1/"
          },
          {
            "xmlns:taxo": "http://purl.org/rss/1.0/modules/taxonomy/"
          },
          {
            "xmlns:rdf": "http://www.w3.org/1999/02/22-rdf-syntax-ns#"
          },
          {
            "xmlns:atom": "http://www.w3.org/2005/Atom"
          },
          {
            "xmlns:wfw": "http://wellformedweb.org/CommentAPI/"
          },
          {
            "xmlns:feedburner": "http://rssnamespace.org/feedburner/ext/1.0"
          },
          {
            "xmlns:atom10": "http://www.w3.org/2005/Atom"
          },
          {
            "xmlns:atom10": "http://www.w3.org/2005/Atom"
          }
        ],
        "#version": "2.0",
        "categories": [],
        "language": "en",
        "link": "http://lifehacker.com",
        "title": "Lifehacker",
        "rss:link": {
          "@": {},
          "#": "http://lifehacker.com"
        },
        "cloud": {
          "type": "hub",
          "href": "http://pubsubhubbub.appspot.com/"
        },
        "image": {},
        "xmlurl": "http://www.lifehacker.com/index.xml",
        "feedburner:info": {
          "@": {
            "uri": "lifehacker/full"
          }
        },
        "feedburner:browserfriendly": {
          "@": {},
          "#": "This is an XML content feed. It is intended to be viewed in a newsreader or syndicated to another site."
        },
        "#xml": {
          "version": "1.0",
          "encoding": "UTF-8"
        },
        "@": [
          {
            "xmlns:itunes": "http://www.itunes.com/dtds/podcast-1.0.dtd"
          },
          {
            "xmlns:dc": "http://purl.org/dc/elements/1.1/"
          },
          {
            "xmlns:taxo": "http://purl.org/rss/1.0/modules/taxonomy/"
          },
          {
            "xmlns:rdf": "http://www.w3.org/1999/02/22-rdf-syntax-ns#"
          },
          {
            "xmlns:atom": "http://www.w3.org/2005/Atom"
          },
          {
            "xmlns:wfw": "http://wellformedweb.org/CommentAPI/"
          },
          {
            "xmlns:feedburner": "http://rssnamespace.org/feedburner/ext/1.0"
          }
        ],
        "pubDate": null,
        "pubdate": null,
        "rss:language": {
          "@": {},
          "#": "en"
        },
        "date": null,
        "generator": null,
        "rss:title": {
          "@": {},
          "#": "Lifehacker"
        },
        "xmlUrl": "http://www.lifehacker.com/index.xml",
        "favicon": null,
        "rss:@": {},
        "atom10:link": [
          {
            "@": {
              "rel": "hub",
              "xmlns:atom10": "http://www.w3.org/2005/Atom",
              "href": "http://pubsubhubbub.appspot.com/"
            }
          },
          {
            "@": {
              "href": "http://www.lifehacker.com/index.xml",
              "rel": "self",
              "xmlns:atom10": "http://www.w3.org/2005/Atom",
              "type": "application/rss+xml"
            }
          }
        ],
        "rss:description": {
          "@": {},
          "#": "Tips and downloads for getting things done"
        },
        "copyright": null,
        "#type": "rss",
        "author": null,
        "description": "Tips and downloads for getting things done"
      },
      "dc:creator": {
        "@": {},
        "#": "Alan Henry"
      },
      "rss:@": {},
      "rss:description": {
        "@": {},
        "#": "<p class=\"first-text\">This OS X desktop is simple, elegant, and combines a few simple widgets with a gorgeous wallpaper to great effect. If you like what you see, here’s how you can set it up, customize your own menubar, and give your Mac the same look.</p>"
      },
      "comments": null,
      "categories": [
        "featured desktop",
        "desktops",
        "wallpapers",
        "customization",
        "personalization",
        "hud",
        "rainmeter",
        "themes",
        "skins",
        "windows",
        "os x",
        "mac",
        "linux"
      ],
      "description": "<p class=\"first-text\">This OS X desktop is simple, elegant, and combines a few simple widgets with a gorgeous wallpaper to great effect. If you like what you see, here’s how you can set it up, customize your own menubar, and give your Mac the same look.</p>"
    },
    {
      ...
    }
  ]
}