What is an Agent?
"Microservices on the frontend"
Jasonette Agent is a new architecture for building native mobile apps that utilizes JavaScript technologies without sacrificing native peformance and user experience. The idea is simple:
- User interacts with the native core.
- The core spawns background JavaScript containers for multiple tasks.
- Core and Agents communicate through JSON-RPC.
In short, it's like microservices, but on the frontend.
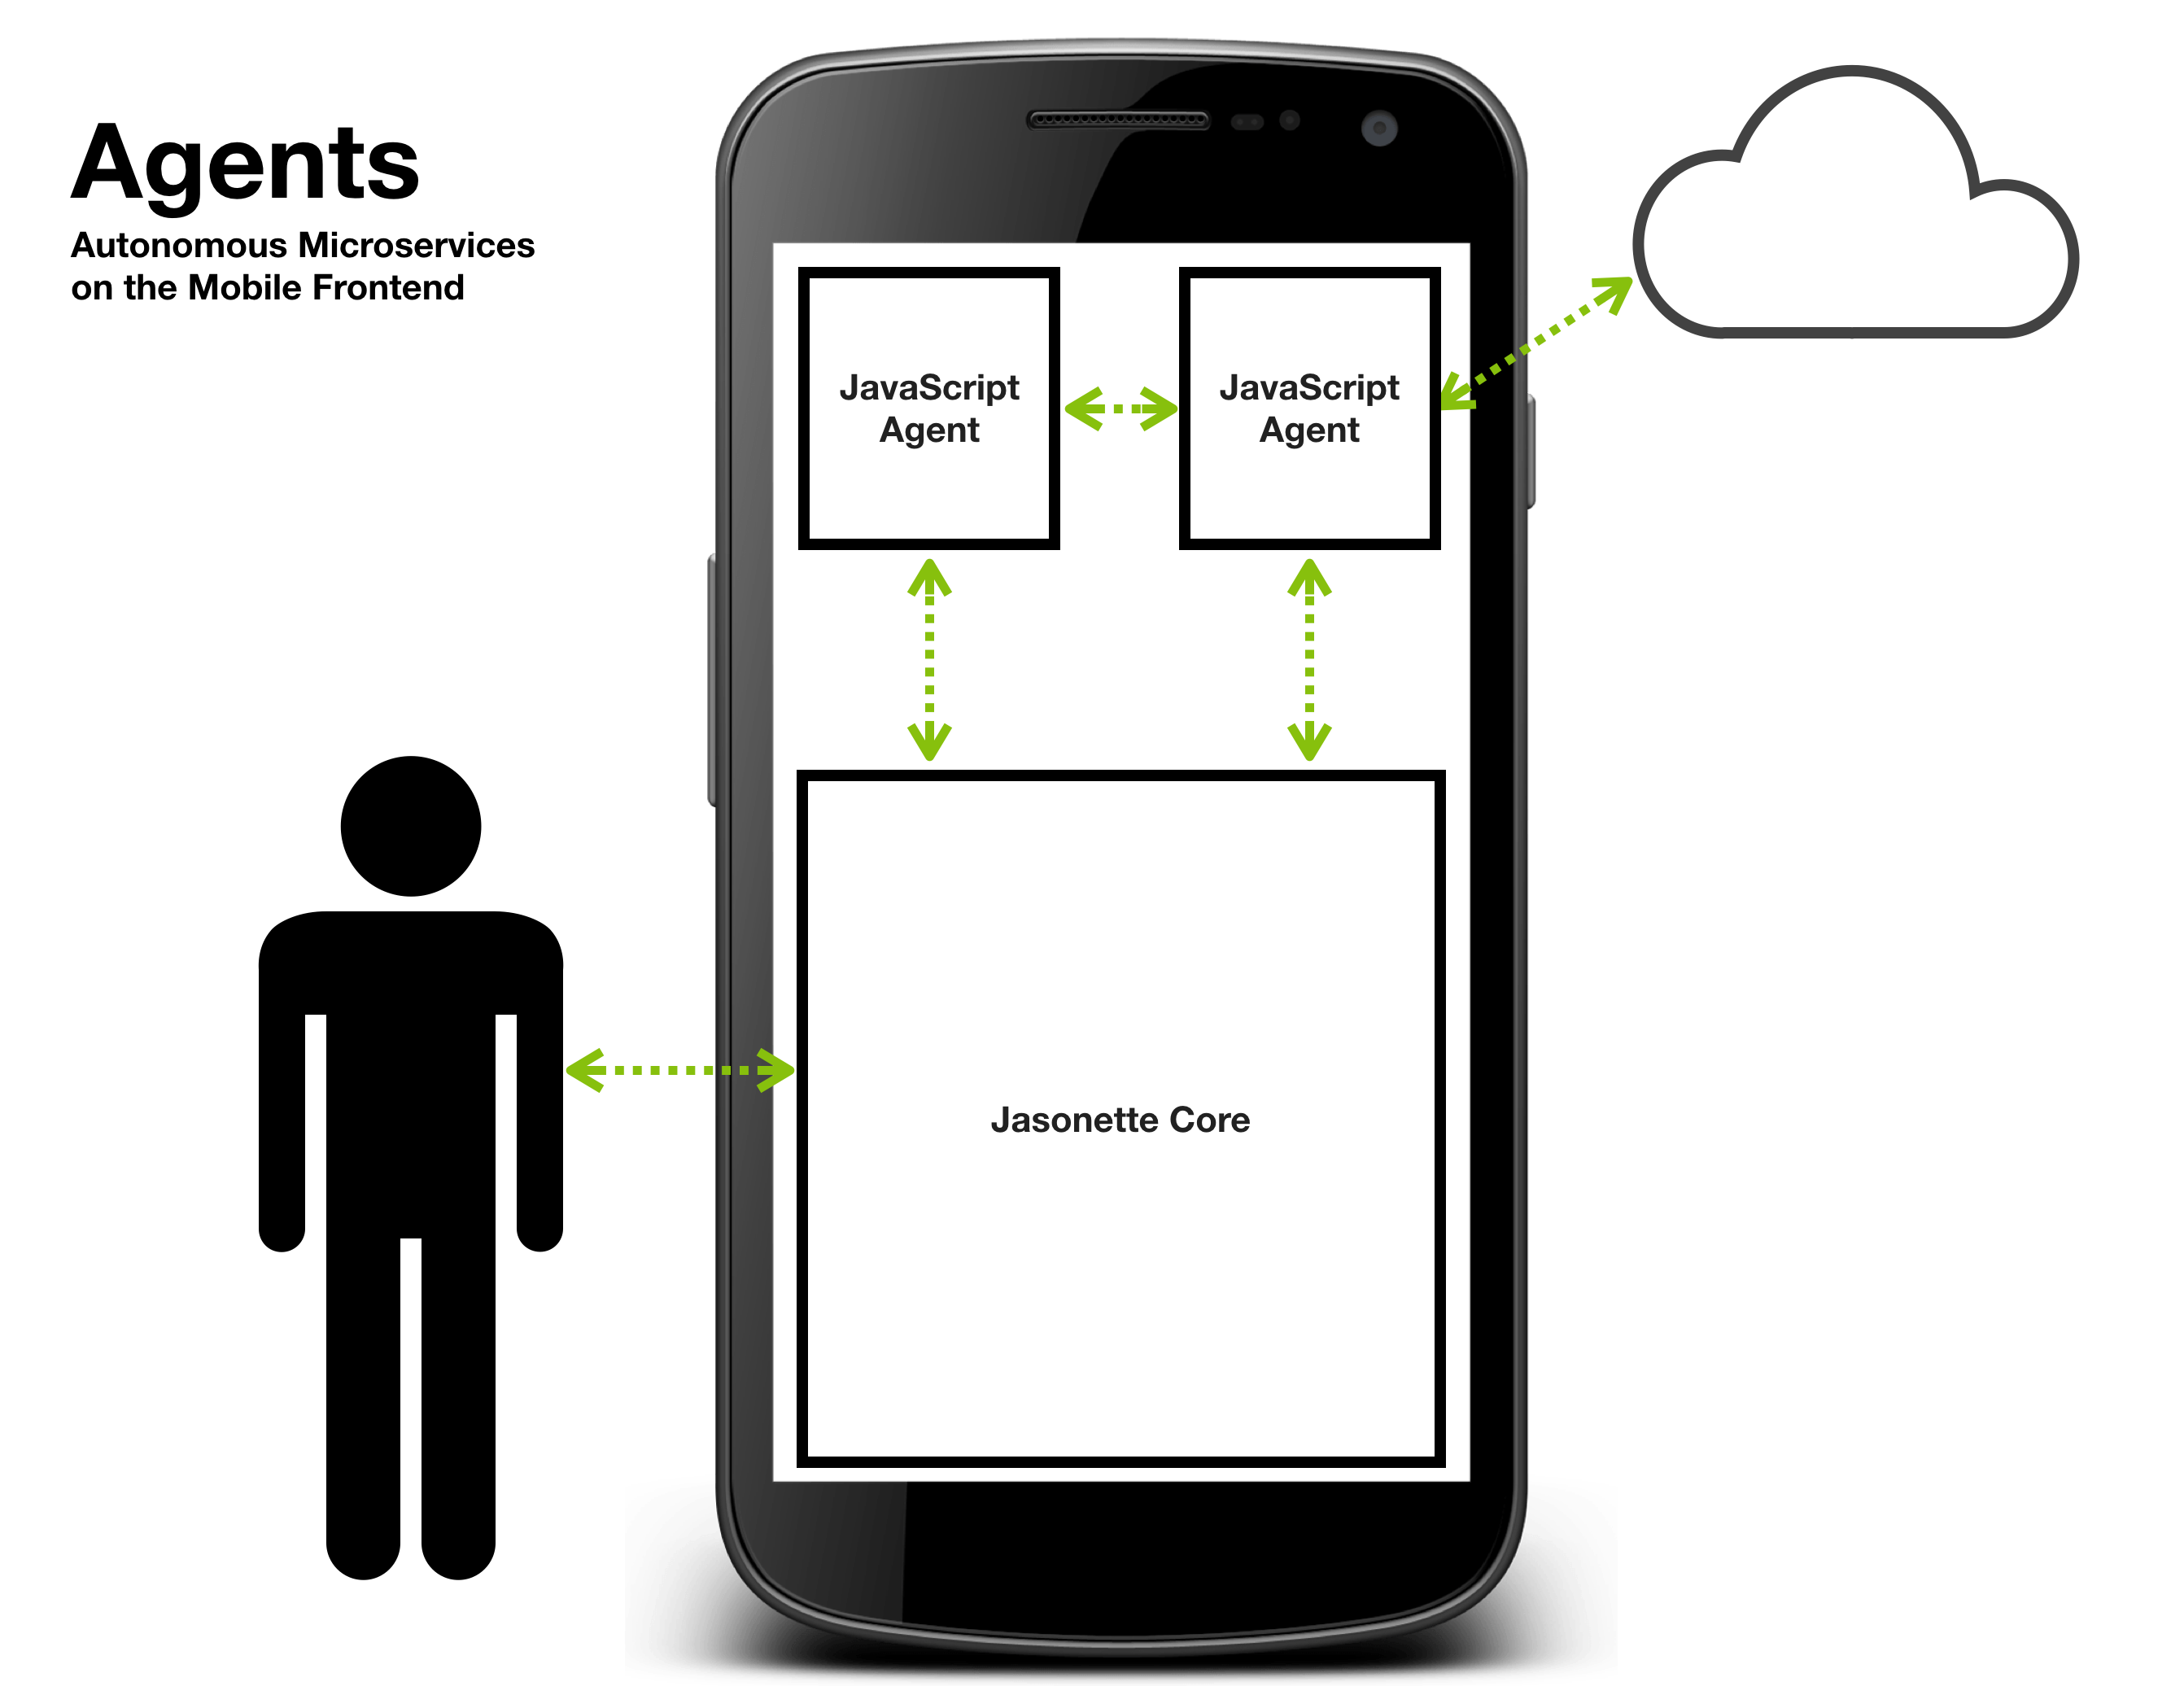
How does it work?
Jasonette Agents are invisible background JavaScript execution environments, internally implemented in WKWebView on iOS and WebView on Android.
Agents are optimized to run in the background (Users never interact directly with agents) and interact with the core native app engine with JSON-RPC.
Since Jasonette is already 100% operated with JSON, the JSON-RPC approach blends into the app seamlessly.
What can it do?
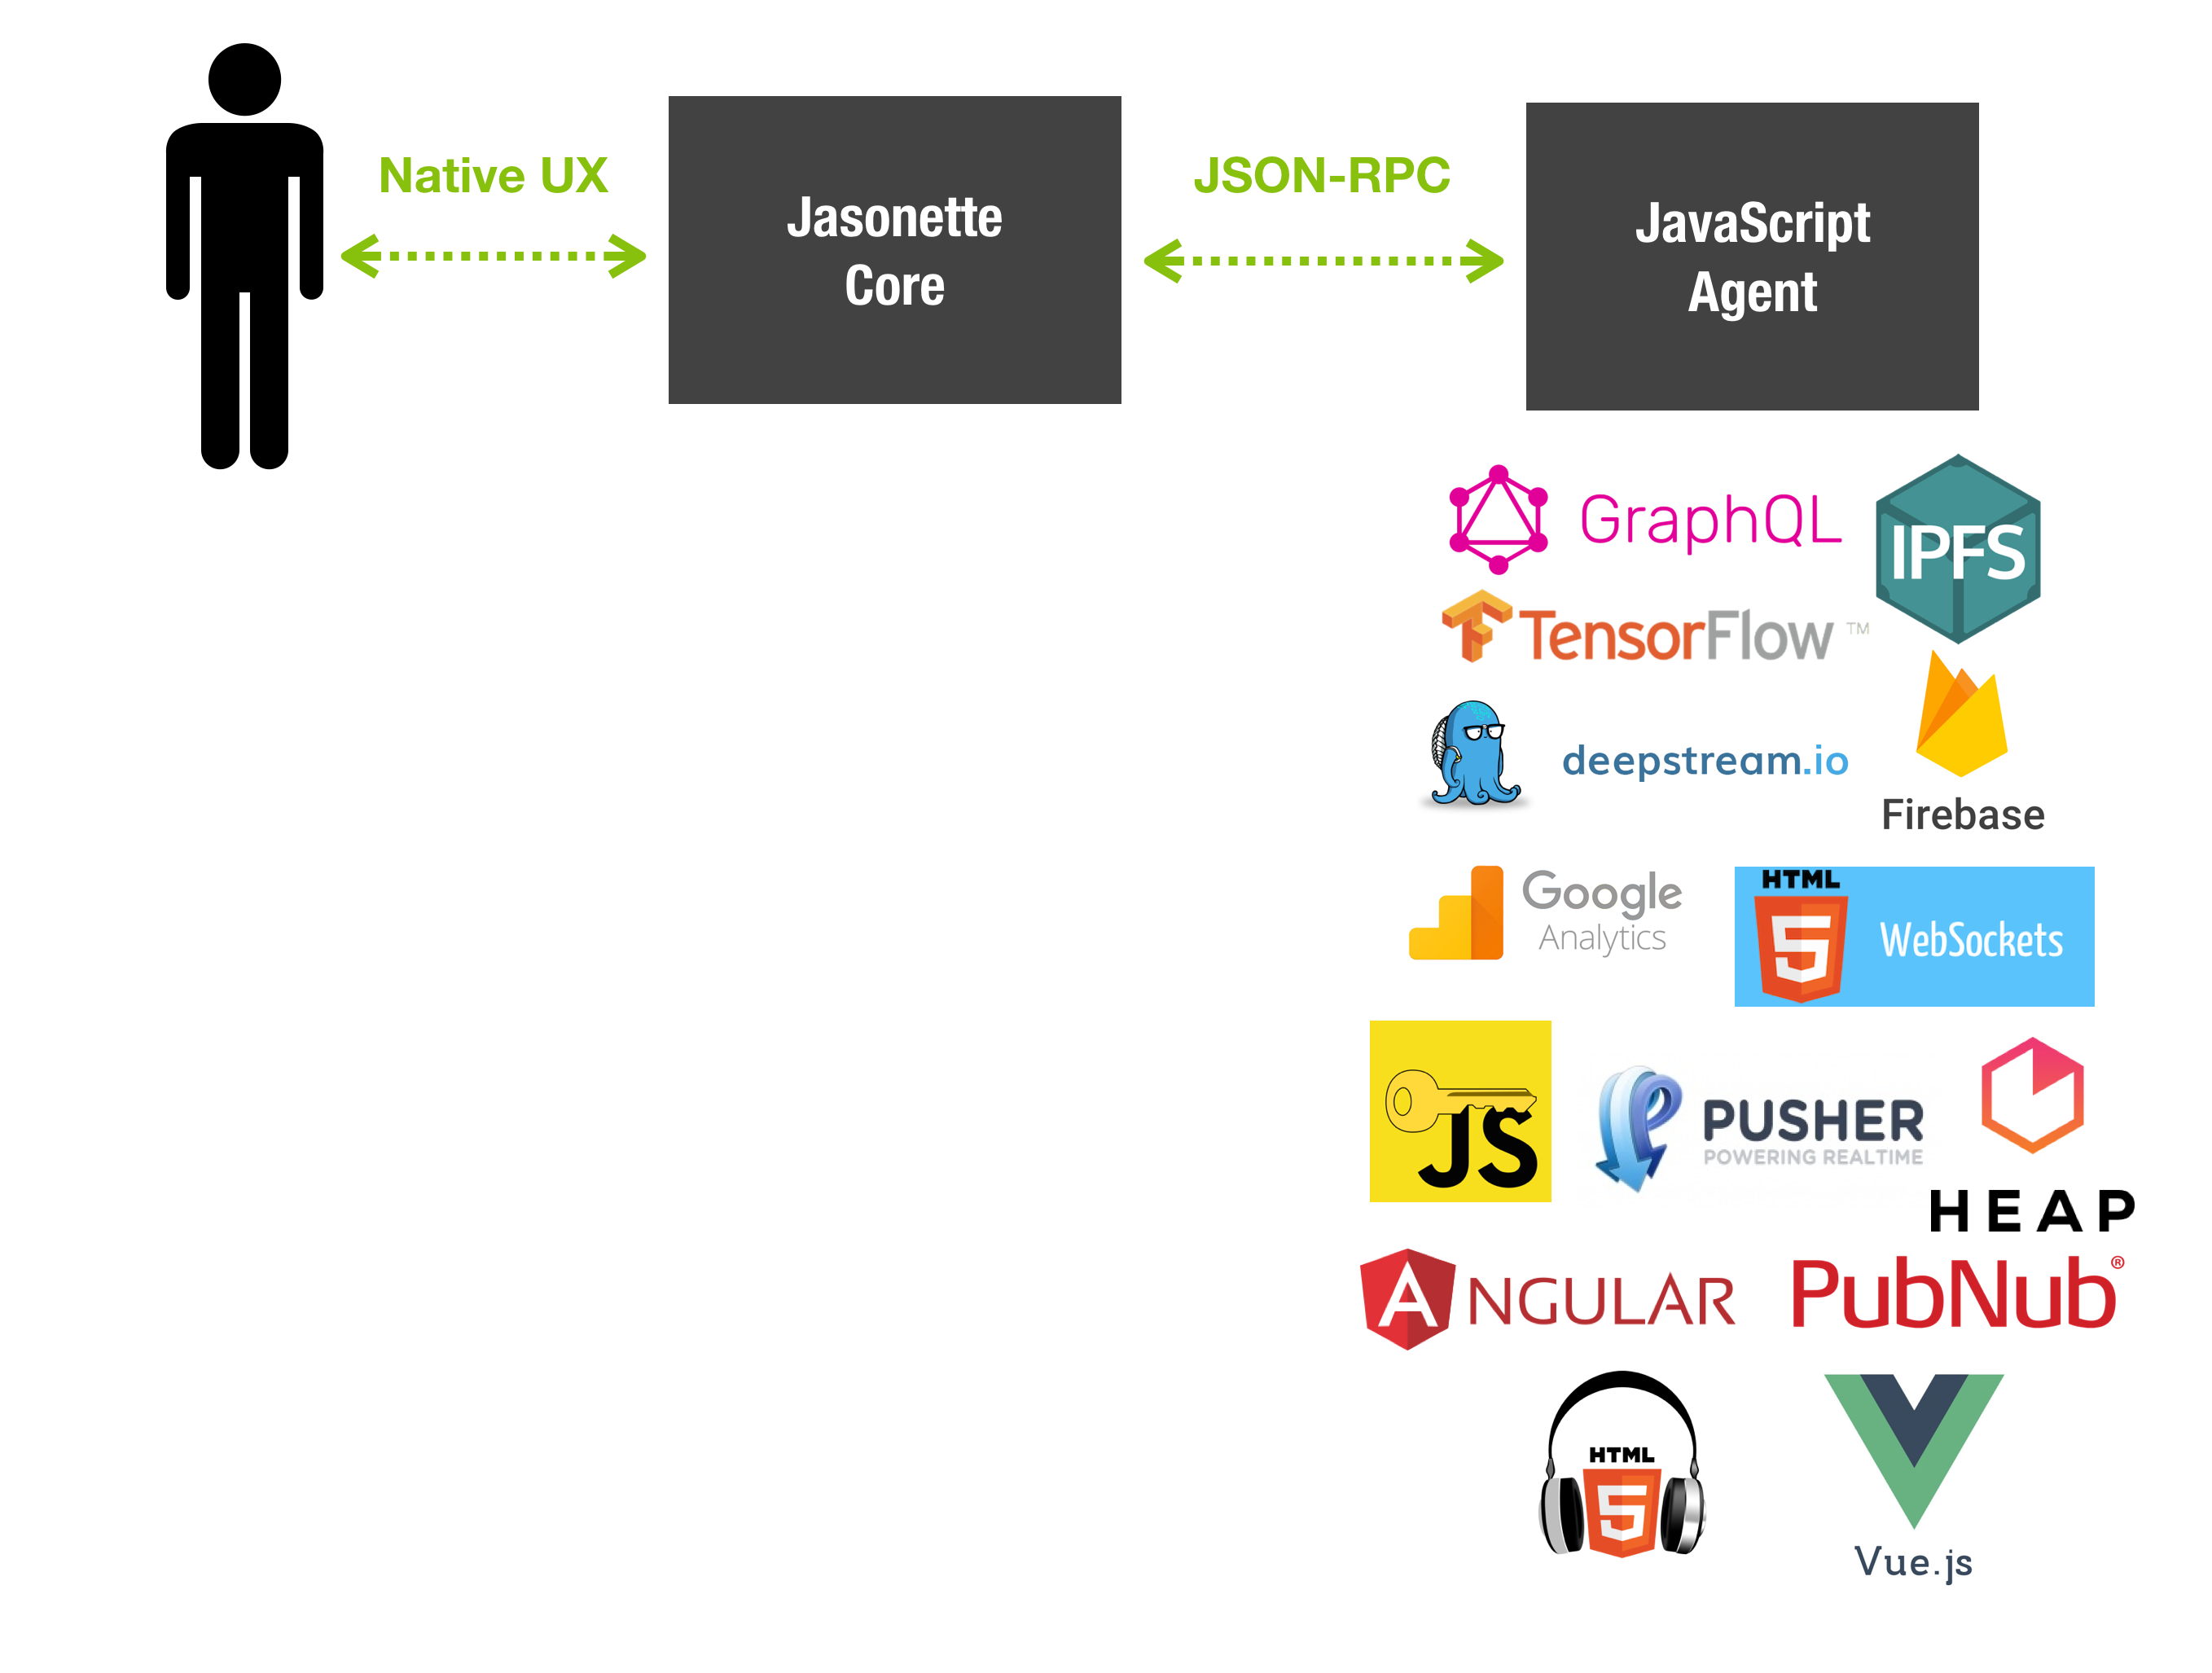
1. Plug in anything in JavaScript
Agents let you build on top of all kinds of web technologies right out of the box. Anything you can do in JavaScript, now you can do with Jasonette. Just plug it in as an agent.
2. Turn your frontend into agent instantly
In fact, if you already have a web app running, you can even plug it into Jasonette as an agent and make it work as a "backend" to Jasonette's native frontend.
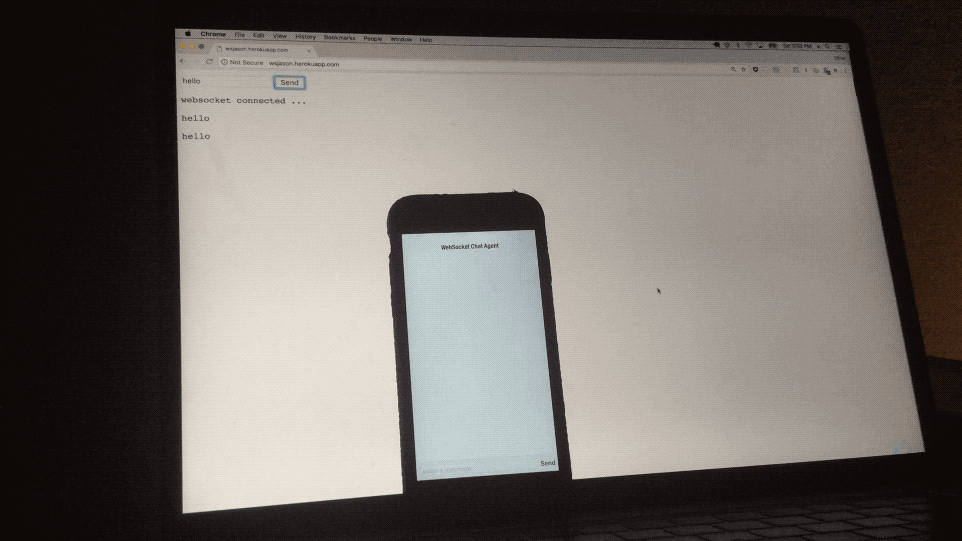
In the example above, we have a website that's already running on websockets on the laptop. Here's the site
Now, we can reuse the same website as an agent by plugging it into Jasonette like below (You can see the full markup for the entire app at https://wsjason.herokuapp.com/app.json):
{
  "$jason": {
    "head": {
      "title": "Websocket Chat",
      "agents": {
        "ws": {
          "url": "https://wsjason.herokuapp.com/"
        }
      },
      ...
    }
  }
}
Above code basically lets you import the site as a Jasonette agent and communicate with it through JSON-RPC going forward.
In the demo you can only see the native app UI on the phone, but in the background the same web app is running to communicate with Jasonette.
You can check out some more examples here: Turn your existing Angular.js, Vue.js, Cell.js app into an Agent
3. Native User Experience meets Multithreading
But let's not forget, Jasonette is ultimately a native app platform. All the user interactions happen on the native core side. Agents run in the background and run tasks for core.
And here's the cool part: There can be multiple agents. This means agents bring multithreading to Jasonette.
Jasonette core is single threaded in order to ensure deterministic UI behaviors. This made it impossible to run multiple concurrent tasks on Jasonette. With agents, all you need to do is offload all the tasks to agents and let them report back through events.
Quickstart
1. Write an agent
An agent is nothing more than a web page.
<html>
<script src="https://cdnjs.cloudflare.com/ajax/libs/crypto-js/3.1.9-1/crypto-js.min.js"></script>
<script>
var md5 = function(data, sync) {
  var result = CryptoJS.MD5(data).toString();
  $agent.response(result);
}
</script>
</html>
We have declared a function called md5 which takes two parameters data and sync.
The md5 function runs some task (CryptoJS task) and then makes an $agent.response() call.
This is where the agent will return the result back to Jasonette. We'll see this below.
2. Plug it into Jasonette
Now that we have an agent. How do we plug it into Jasonette?
All you need to do is declare the URL under $jason.head.agents.
{
  "$jason": {
    "head": {
      "title": "$agent.request Demo",
      "description": "Jasonette to Agent request demo",
      "agents": {
        "crypto": {
          "url": "file://crypto.html"
        }
      },
      ...
We have named this agent "crypto", and enter the url. We will use this as the id when making JSON-RPC requests.
In this case we used a file:// url scheme, but you can also load a remote agent with an http[s]:// scheme.
3. Make JSON-RPC calls
Now let's actually make a function call into the md5 function from the agent.
Below is the JSON action that wil make a JSON-RPC call to the agent.
The $agent.request is the Jasonette action that makes agent JSON-RPC calls, and the options object is the actual JSON-RPC request object.
{
  "type": "$agent.request",
  "options": {
    "id": "crypto",
    "method": "md5",
    "params": ["{{$get.raw}}", "{{$jason.sync}}"]
  },
  "success": {
    "trigger": "add",
    "options": {
      "result": "{{$jason}}"
    }
  }
}
Remember the how the md5 function from above?
The JSON-RPC object is basically saying "find an agent with an id of 'crypto', ask the agent to run a function called 'md5' with the two parameters."
var md5 = function(data, sync) {
  var result = CryptoJS.MD5(data).toString();
  $agent.response(result);
}
When the function finishes running, this $agent.response will trigger the success callback on the Jasonette core side, and now Jasonette will continue executing rest of the action call chain.
4. Learn More
This was just one API method usage. You can learn more features by reading on to the next section, or you can also take a look at some demos
API
This documentation discusses:
- Declare: How to declare agents
- Communicate: How to communicate with agents
1. Declare
Each view can have multiple agents. Every agent is sandboxed to their parent view.
Agents are set up declaratively (instead of manually initializing through actions, for example) to ensure they are automatically initialized as soon as their parent view loads.
Syntax
-
You can define agents under
$jason.head.agents- Each key/value pair represents a sandboxed agent.
- The key is the name of the agent we'll use to make requests later
- The value is the JSON markup that represents the agent.
- Each key/value pair represents a sandboxed agent.
-
Each Agent can take one of the following attributes:
- url: the URL to load content from
- http[s]?:// : Any http/https remote url
- file:// : Any locally embedded file url (under
file://directory)
- text: Or you can fill it in inline with a piece of HTML text
- url: the URL to load content from
Example
The following code sets up 3 separate sandboxed HTML/JavaScript environments.
js_sandboxloads from an HTML text.web3loads from a file url.firebaseloads from a remote https url.
{
  "$jason": {
    "head": {
      "title": "Agent Demo",
      "agents": {
        "js_sandbox": {
          "text": "<html><script>var injected = function(a) { return a; }</script></html>"
        },
        "web3": {
          "url": "file://web.html"
        },
        "firebase": {
          "url": "https://jasonette-agent.github.io"
        }
      }
    }
  }
}
Once set up, each agent runs on its own, communicating with
- Jasonette and
- Other agents sometimes
2. Communicate
Now that everything's set up, we can finally communicate with agents. Below is an overview of how:
- Jasonette can interact with agents
- Agents can interact with other agents.
Overview
1. Outside => Agent
The outside world can make function call requests to agents.
-
Jasonette => Agent: You can make requests from Jasonette to agents using a Jasonette action.
- "type": "$agent.request": Call any JavaScript function in the agent.
-
Agent => Agent: Agents can make requests to another agent using a JavaScript function.
- $agent.request(request): Make a remote function call into another agent, using a JSON-RPC call.
2. Agent => Outside
Agents can send messages to the outside world with 3 designated JavaScript functions.
- $agent.response(response)
- Used to return results in response to an
$agent.requestcall. - Can respond to both agent functions (from another agent) and Jasonette actions.
- Note: All
$agent.responsemust have been triggered by an$agent.requestsomewhere else in order for it to work.
- Used to return results in response to an
- $agent.trigger(event, options)
- Unlike
$agent.responsewhich can only return results to an$agent.request,$agent.triggercan be used any time and anywhere at will. - Can trigger a Jasonette event (under
$jason.head.actions). It's powered by Jasonette's native trigger. - Note:
triggercan only trigger existing events, which means if the event doesn't already exist on the Jasonette side under$jason.head.actions, it won't work. This is to ensure security, so that malicious HTML agent can't trigger any action that Jasonette wasn't aware of.
- Unlike
- $agent.href(href)
- trigger a Jasonette href from Agent
API
Here are API actions/functions that lets you communicate with agents.
- $agent.request: Make requests to agents
- $agent.response: Let agents return a response to a request call
- $agent.trigger: Trigger Jasonette events from agents
- $agent.href: Call Jasonette href from agents
- $agent.refresh: Refresh the agent context.
- $agent.clear: Clear the agent context.
- $agent.inject: Dispatch a 3rd party JavaScript function call into an existing agent.
1. $agent.request
$agent.request loosely follows the JSON-RPC 2.0 spec.
More specifically, each request object contains three attributes:
- id
- method
- params
1.1. Jasonette => Agent
You can use the "type": "$agent.request" action to call an agent's JavaScript function from Jasonette.
Syntax
Just like any other Jasonette action, the $agent.request takes 4 parameters:
- type:
"$agent.request" - options: The JSON-RPC request object
- id: The agent id you're targeting. You should have set up the agent with this id before calling this action.
- method: The function name to call
- params: An array of parameters to pass to the function
- success
- The next Jasonette action to run when the agent responds.
- Triggered the agent responds with an
$agent.response()call.
- error
- Only called when there was a problem connecting to the agent.
- Any error from INSIDE the agent is sandboxed inside the agent, so if you want to handle those, you should use
$agent.response()and handle it inside thesuccesscallback above.
Example
The following JSON markup calls
- a
whatsyournamefunction - inside
"007"agent - with two parameters:
"James"and"Bond".
{
  "type": "$agent.request",
  "options": {
    "id": "007",
    "method": "whatsyourname",
    "params": ["James", "Bond"]
  },
  "success": {
    "type": "$util.alert",
    "options": {
      "title": "Name is",
      "description": "{{$jason}}"
    }
  }
}
When the whatsyourname function returns some result via $agent.response() JS function, the $agent.request can pick up where it left off and go ahead with its success callback.
// Inside agent "007".
// The function has an immediate return value.
var whatsyourname = function(firstname, lastname) {
  // synchronously return with a return value
  $agent.response("The name is " + lastname + ". " + firstname + " " + lastname);
}
1.2. Agent => Agent
Agents can also talk to one another.
Syntax
$agent.request(request[, callback])
Parameters
-
request: JSON-RPC request Object.Same as the
$agent.requestJasonette action, the request object can have 3 attributes:- id: The agent id you're targeting. Required
- method: The function name to call
- params: The parameters to pass to the function
-
callback: A callback function that will be triggered by an$agent.response()from the callee agent.
Example
Example 1. One way function call (without callback)
Making a whatsyourname("James", "Bond") function call into a remote agent named "007".
$agent.request({
  "id": "007",
  "method": "whatsyourname",
  "params": ["James", "Bond"]
})
In this particular example, there's no return value so it may not look useful at first sight.
But the 007 agent can for example directly communicate with Jasonette via "trigger" or "href" instead of returning its control back to the caller agent.
Example 2. Function call with a callback
This time we would like to process the return value.
// Inside agent "007".
// The function has an immediate return value.
var whatsyourname = function(firstname, lastname) {
  // synchronously return with a return value
  $agent.response("The name is " + lastname + ". " + firstname + " " + lastname);
}

// Inside agent "M"
$agent.request({
  "id": "007",
  "method": "whatsyourname",
  "params": ["James", "Bond"]
}, function(response) {
  console.log("Returned value = ", response);
})
Two things to notice:
- The
whatsyournamefunction calls the$agent.response()function to return its result back to the caller. - The
$agent.request()function now has a second argument, which is a callback function that will handle the data returned with the$agent.response().
2. $agent.response
Agents are designed to interact with the outside world both synchronously and asynchronously.
In some cases agent functions can return immediately (synchronous), but in many other cases we need to run a long-running function before returning a result (asynchronous). It could be an ajax call, or it could be any other time consuming task.
Agents can utilize a single function named $agent.response
Syntax
$agent.response(response)
Paramerters
response: Any JavaScript object that can be represented as a flat JSON. Just remember that it can transport anything that can be represented as a JSON string.- non-circular: all circular references within the object will be stripped out.
- only data: functions will be stripped out.
Example
We've already seen how agent functions can return results in a synchronous manner.
Let' take a look at how you can call agent functions that run asynchronous tasks (It works pretty much the same).
// Inside agent "007"
// The function doesn't have a return value
// Instead it waits for 3 seconds before calling $agent.response() asynchronously.
var whatsyourname = function(firstname, lastname) {
  // Asynchronously return after 3 seconds
  setTimeout(function() {
    $agent.response("The name is " + lastname + ". " + firstname + " " + lastname)
  }, 3000);
}

// Inside agent "M"
$agent.request({
  id: "007",
  "method": "whatsyourname",
  "params": ["James", "Bond"]
}, function(response) {
  console.log("Returned value = ", response);
})
3. $agent.trigger
An agent can also call Jasonette. But we can't just let any agent execute arbitrary Jasonette actions for security reasons.
Instead, agents can trigger events that are already defined on the Jasonette side under $jason.head.actions.
Syntax
$agent.trigger is a JavaScript function which can trigger a Jasonette event, along with a payload which will be set to the variable $jason.
$agent.trigger(event[, options])
Parameters
event: A Jasonette event name string.options: An additional payload to send along with the event. It will be accessible as$jasoninside the triggered action.
Note: Notice there's no callback parameter. $agent.trigger is a fire-and-forget scheme. There is no way to get a response back from Jasonette for security reasons.
Example
Example 1. Simple Event Trigger
Let's look at this code:
{
  "$jason": {
    "head": {
      "agents": {
        "simple": {
          "url": "file://app.html"
        }
      },
      "actions": {
        "refresh": {
          "type": "$render"
        }
      }
    }
  }
}
Since the refresh event is declared under $jason.head.actions, we can trigger it from agents, like this:
$agent.trigger("refresh")
2. Event trigger with payload
You can trigger an event with an additional payload too.
Take a look at this code:
{
  "$jason": {
    "head": {
      "agents": {
        "simple": {
          "url": "file://app.html"
        }
      },
      "actions": {
        "banner": {
          "type": "$util.alert",
          "options": {
            "title": "{{$jason.title}}",
            "description": "{{$jason.description}}"
          }
        }
      }
    }
  }
}
Notice now we have a $util.alert action which expects a $jason variable to be passed in.
We can trigger this from the simple agent with:
$agent.trigger("banner", {
  "title": "Hello",
  "description": "World"
});
4. $agent.href
You can trigger a Jasonette href transition from an agent.
Syntax
$agent.href(href)
Parameters
Basically you're just passing a Jasonette href object as an argument.
href: a Jasonette href object. See href for more.
Example
$agent.href({
  "url": "https://www.jasonbase.com/things/3nf.json",
  "optons": {
    "data": "hi"
  },
  "transition": "modal"
})
5. $agent.refresh
A Jasonette action that lets you refresh an agent context with id. Reloads the web container that contains the agent.
Parameters
id: The id of an existing agent in the current view to refresh
Example
{
  "type": "$agent.refresh",
  "options": {
    "id": "crypto"
  }
}
6. $agent.clear
A Jasonette action that lets you clear an agent's entire context with id.
The HTML/JavaScript app will be completely cleared out of the agent.
Parameters
id: The id of an existing agent in the current view to refresh
Example
{
  "type": "$agent.clear",
  "options": {
    "id": "crypto"
  }
}
7. $agent.inject
Sometimes an agent may want to dynamically run some task that's not included in the agent's original HTML code. This may be the case if you don't have control over the agent's HTML.
$agent.inject is an action that lets you dynamically inject a 3rd party JavaScript code into an existing agent context.
Parameters
id: The recepieint agent ID.items: An array of injection objects, each of which has the following attribute:url: supportsfile://orhttp://orhttps://urls to load JavaScript code fromtext: inline JS code
Example
Let's say an agent needs to access a username/password pair stored under $key and instantly sign in a user to a website. (For example, sites like news.ycombinator.com which you don't own)
1. We could implement a function that looks like the following:
var auth = function(username, password) {
  document.querySelector(".username").value = usenrame;
  document.querySelector(".password").value = password;
  document.querySelector("form.signin").submit();
  $agent.trigger("signed_in");
}
2. Since this function is NOT included in the original agent code (because you don't own news.ycombinator.com) we will need to inject AND execute.
3. Here's how we would do it:
{
  "type": "$agent.inject",
  "options": {
    "id": "HN",
    "items": [{
      "url": "file://authentication.js"
    }]
  },
  "success": {
    "type": "$agent.request",
    "options": {
      "id": "HN",
      "method": "auth",
      "params": ["gliechtenstein", "12341234"]
    }
  }
}
Here's what's going on:
- We first look up the agent using
id. This will be the recipient of the task. - Then we inject the JavaScript file at
file://authentication.js. - Next step, we call
$agent.request, which makes a function call into the agent context. This time, the$agent.requestcall will work since theauthfunction has been injected.
Agent Lifecycle
- Agents are sandboxed per JASON view.
- One JASON view can conain many agents.
- When a user navigates away from a view, all its child agents immediately get garbage collected. So if your agent was running a persistent websockets connection for example, it will automatically be destroyed.
- If a user navigates from view A to view B, and back to view A
- all the agents under view A gets destroyed when the view A -> view B transition happens
- all of view A's agents automatically get re-initialized when coming back from view B -> view A.
- You can call
$agent.requestat any timing (for example$loador$showor$foreground, etc.). If the agent is not yet ready when the request was made, the request will be automatically queued until the recipient agent is ready to process the request.
Demos
Here are some demos you can try out right now: